Outdoor Tile Drainage and Slope Setup for Indian Rainfall: A Practical Guide
June 15, 2026 12
Learn the correct outdoor tile drainage and slope setup for Indian rainfall. Discover ideal gradients, anti-skid tiles, drainage channels, and waterproofing tips to prevent waterlogging.
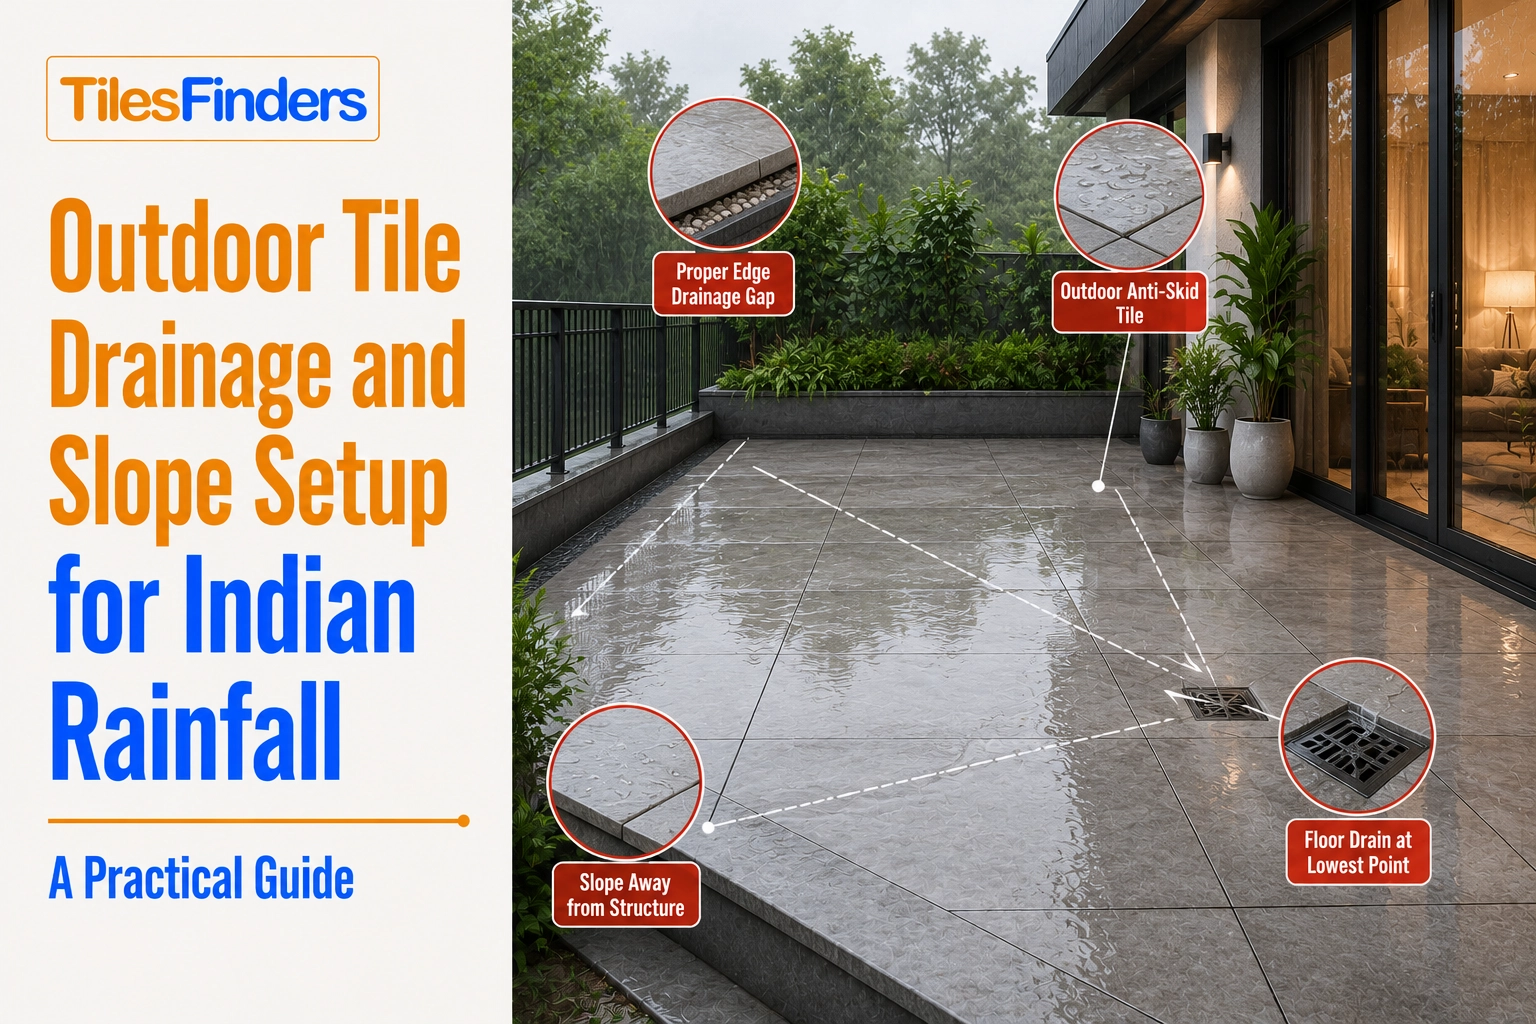
Outdoor tiles need a proper 1:50 to 1:80 slope, effective drainage outlets, and waterproofing beneath the tile bed to prevent waterlogging, algae growth, and tile lifting during Indian monsoons. For the best long-term performance, choose anti-skid vitrified tiles, create the slope in the screed layer, and use well-planned drainage channels before tile installation.
Walk onto any terrace, balcony, or parking area after a heavy rain in July, and you will quickly find out whether the tile slope was done correctly. Standing water, muddy puddles, and tiles that rock underfoot are not weather problems. There are installation problems.
India receives anywhere from 600 mm to over 3000 mm of rainfall annually, depending on the region. A flat outdoor tile surface has no chance against that volume. This guide covers the full setup: slope gradients, drainage placement, the right tile categories, and the waterproofing layer that holds it all together.
Why Drainage and Slope Matter More in India
Most tile installation guides are written for temperate climates where rain falls lightly and drains slowly. India's monsoon is different. Coastal cities like Mumbai, Kochi, and Chennai receive intense bursts within short windows. Even in drier zones like Rajasthan or Gujarat, summer thunderstorms can dump 50-80 mm in under an hour.
Monsoon Rainfall Intensity Across Indian Regions
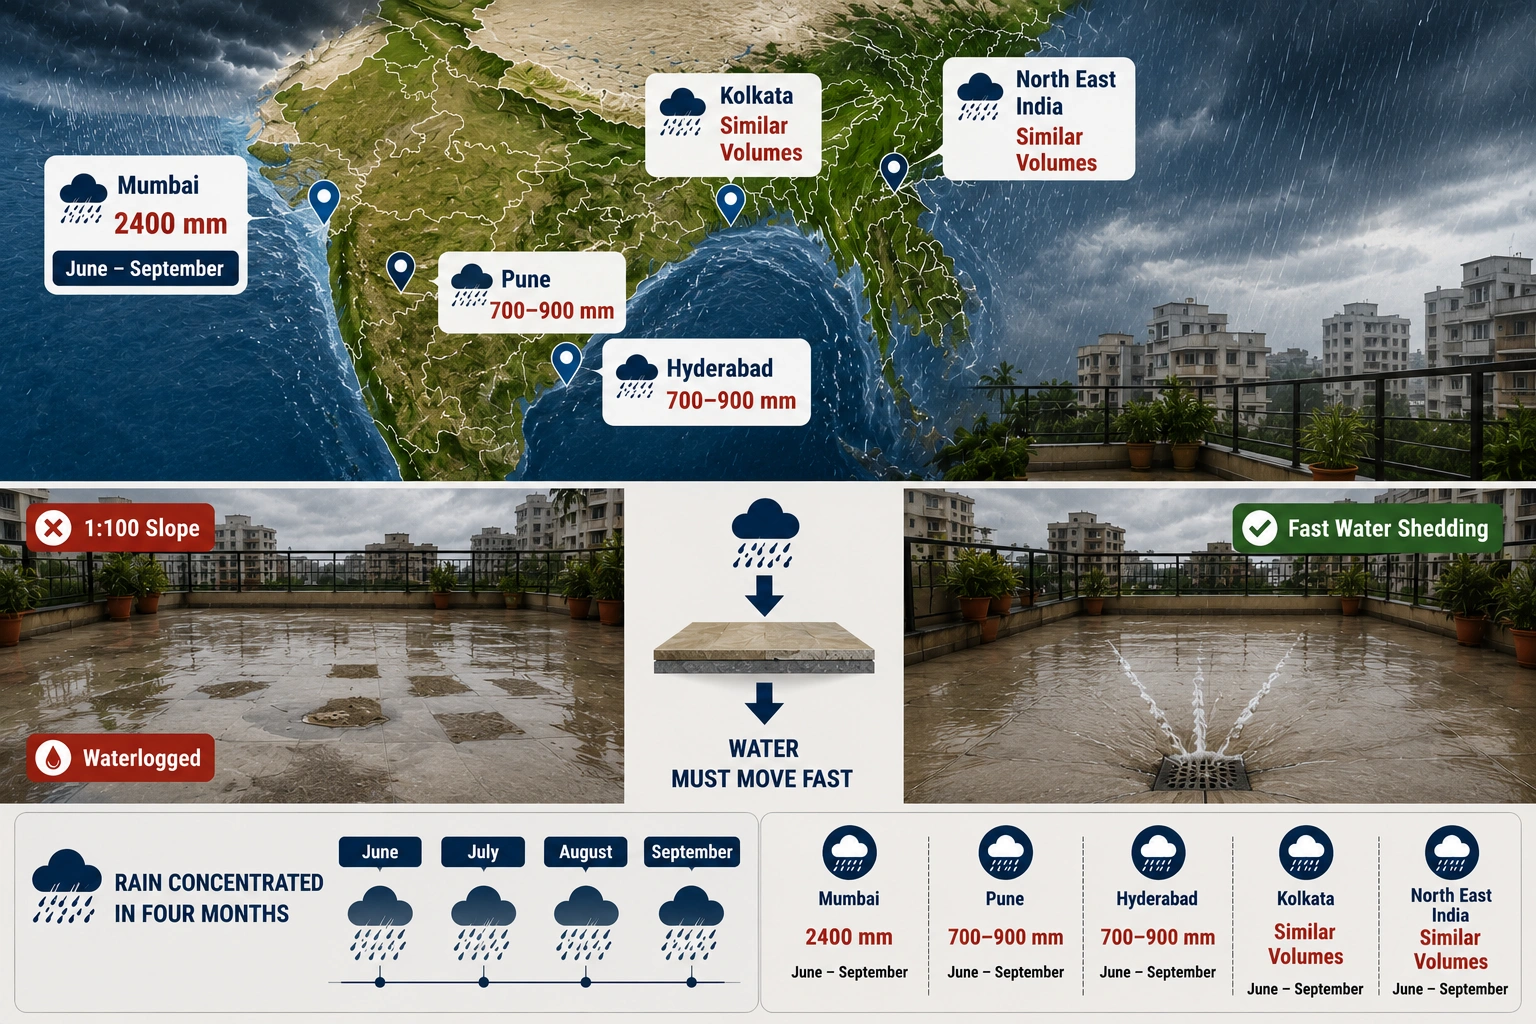
Outdoor tiles on the Western coast face the harshest conditions. Mumbai averages 2400 mm from June to September. Kolkata and the North East receive similar volumes. Even cities in the Deccan plateau like Pune and Hyderabad see 700-900 mm in a concentrated four-month period.
This concentration matters because it means your tile surface needs to shed water fast, not gradually. A 1:100 slope that would work fine in London will leave your Pune terrace waterlogged for hours.
What Happens When Outdoor Tiles Are Laid Flat
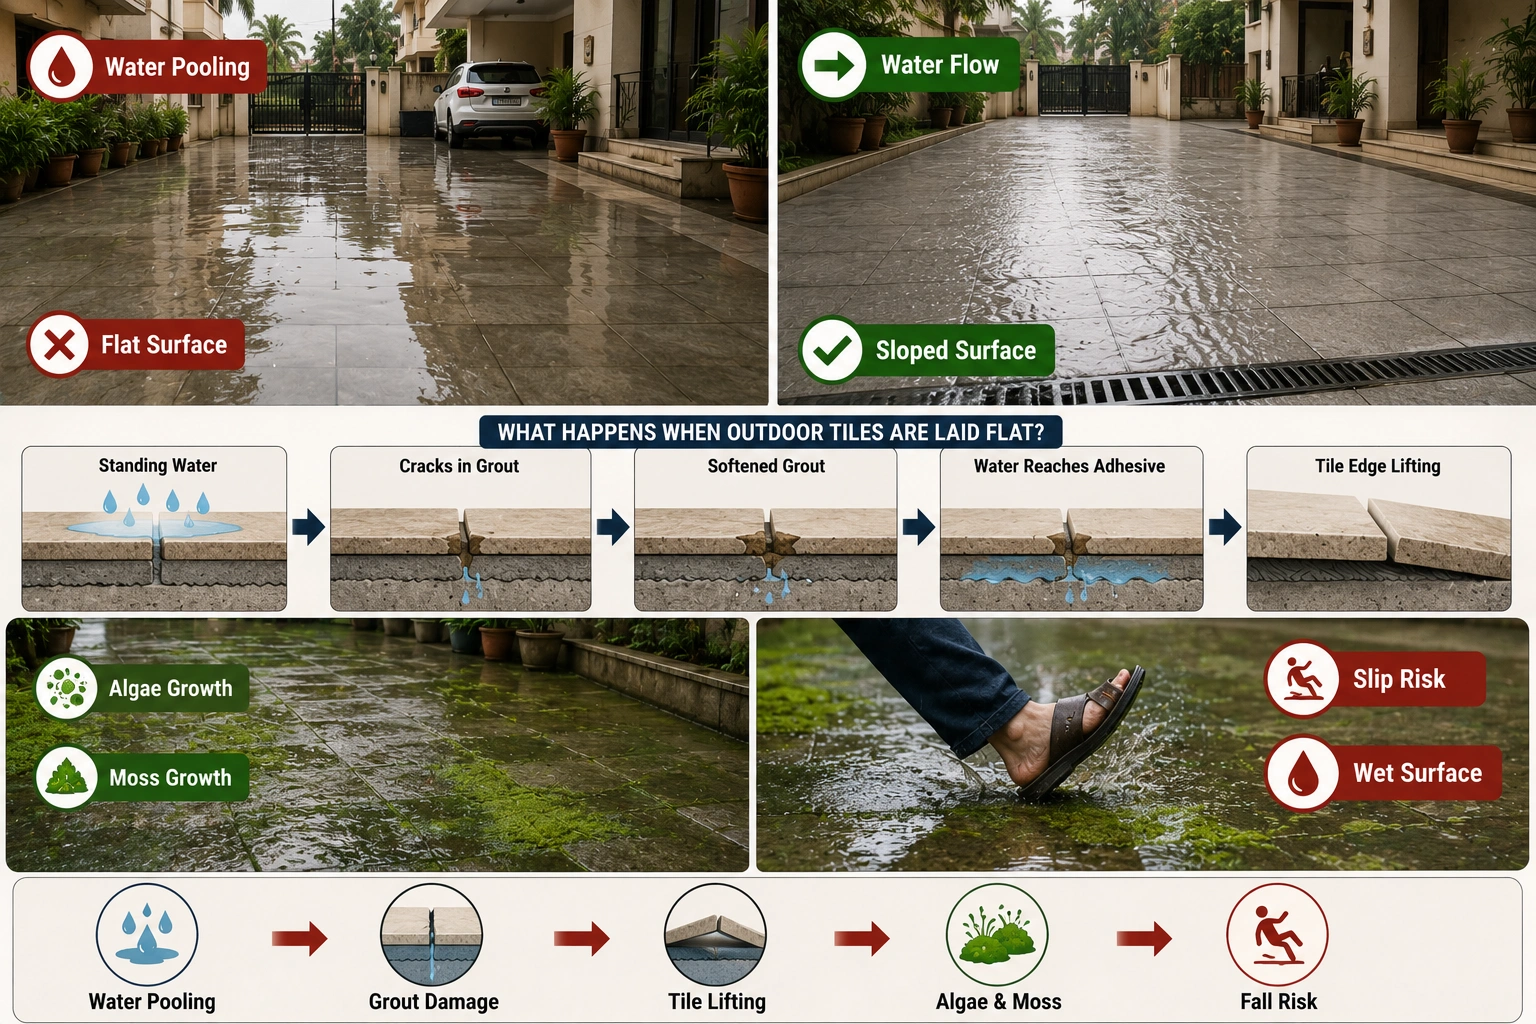
Tiles installed without slope collect water at the surface. That pooled water seeps into hairline cracks in grout joints. Over two or three monsoon cycles, grout softens and breaks down. Water then reaches the adhesive layer, causes debonding, and tiles begin to lift at the edges and corners.
Flat outdoor floors also grow algae and moss within a few weeks of monsoon onset. Beyond the maintenance headache, wet moss on a smooth tile surface is a serious fall risk. Slope solves the water problem and reduces biological growth significantly.
The Right Slope Gradient for Outdoor Tiles
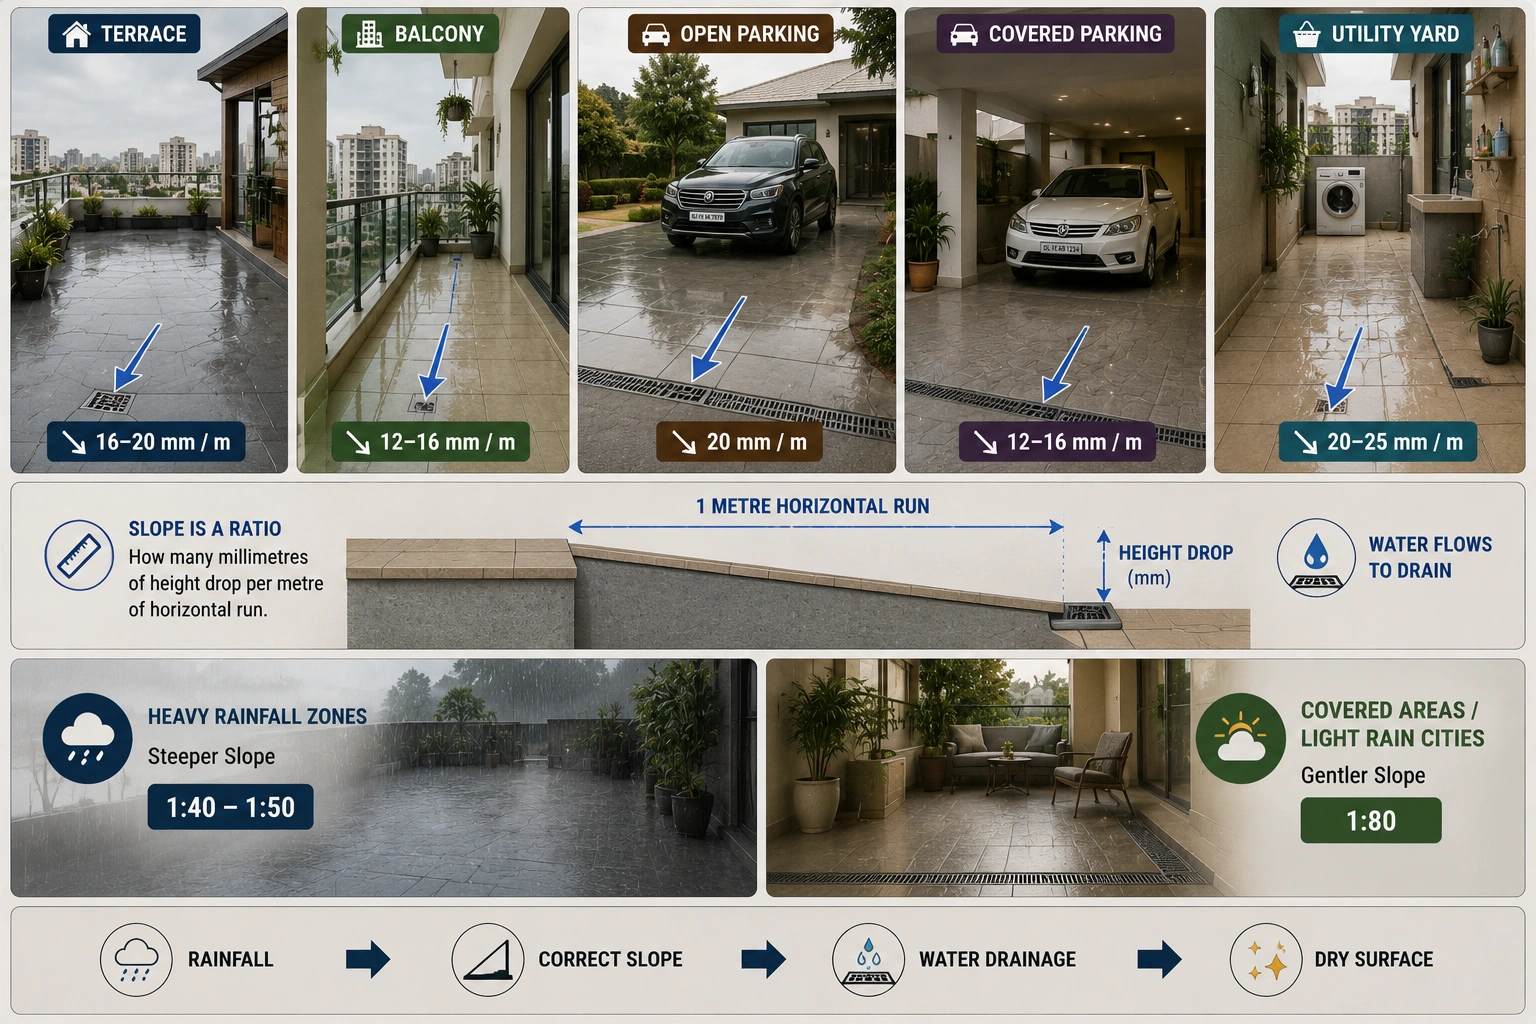
A slope is measured as a ratio: how many millimetres of height drop per metre of horizontal run. Indian construction practice follows IS 3414 for flooring and BS 5385 for external tiling as a general reference. The practical range for outdoor floors falls between 1:50 and 1:80.
| Space Type | Recommended Slope | Drop per metre |
| Terrace / Roof | 1:50 to 1:60 | 16-20 mm per metre |
| Balcony | 1:60 to 1:80 | 12-16 mm per metre |
| Open Parking | 1:50 | 20 mm per metre |
| Covered Parking | 1:60 to 1:80 | 12-16 mm per metre |
| Utility / Rear Yard | 1:40 to 1:50 | 20-25 mm per metre |
The steeper end of the range (1:40 or 1:50) suits heavy-rainfall zones. The gentler end (1:80) works for covered areas or light-rain cities in North India where winter rain is minimal.
Standard Slope Ratio for Different Outdoor Spaces

For a standard 3-metre-wide balcony sloped toward the outer drain, you need 37-50 mm of total drop from wall to drain edge at 1:60 to 1:80. The screed layer carries most of this slope, not the tile thickness.
On terraces sloped toward a central gully or corner outlet, divide the terrace into fall zones. Each zone slopes independently toward its nearest outlet. This prevents the error of a long flat run with a steep drop only at the edge.
How to Calculate Slope Over Longer Terrace Runs
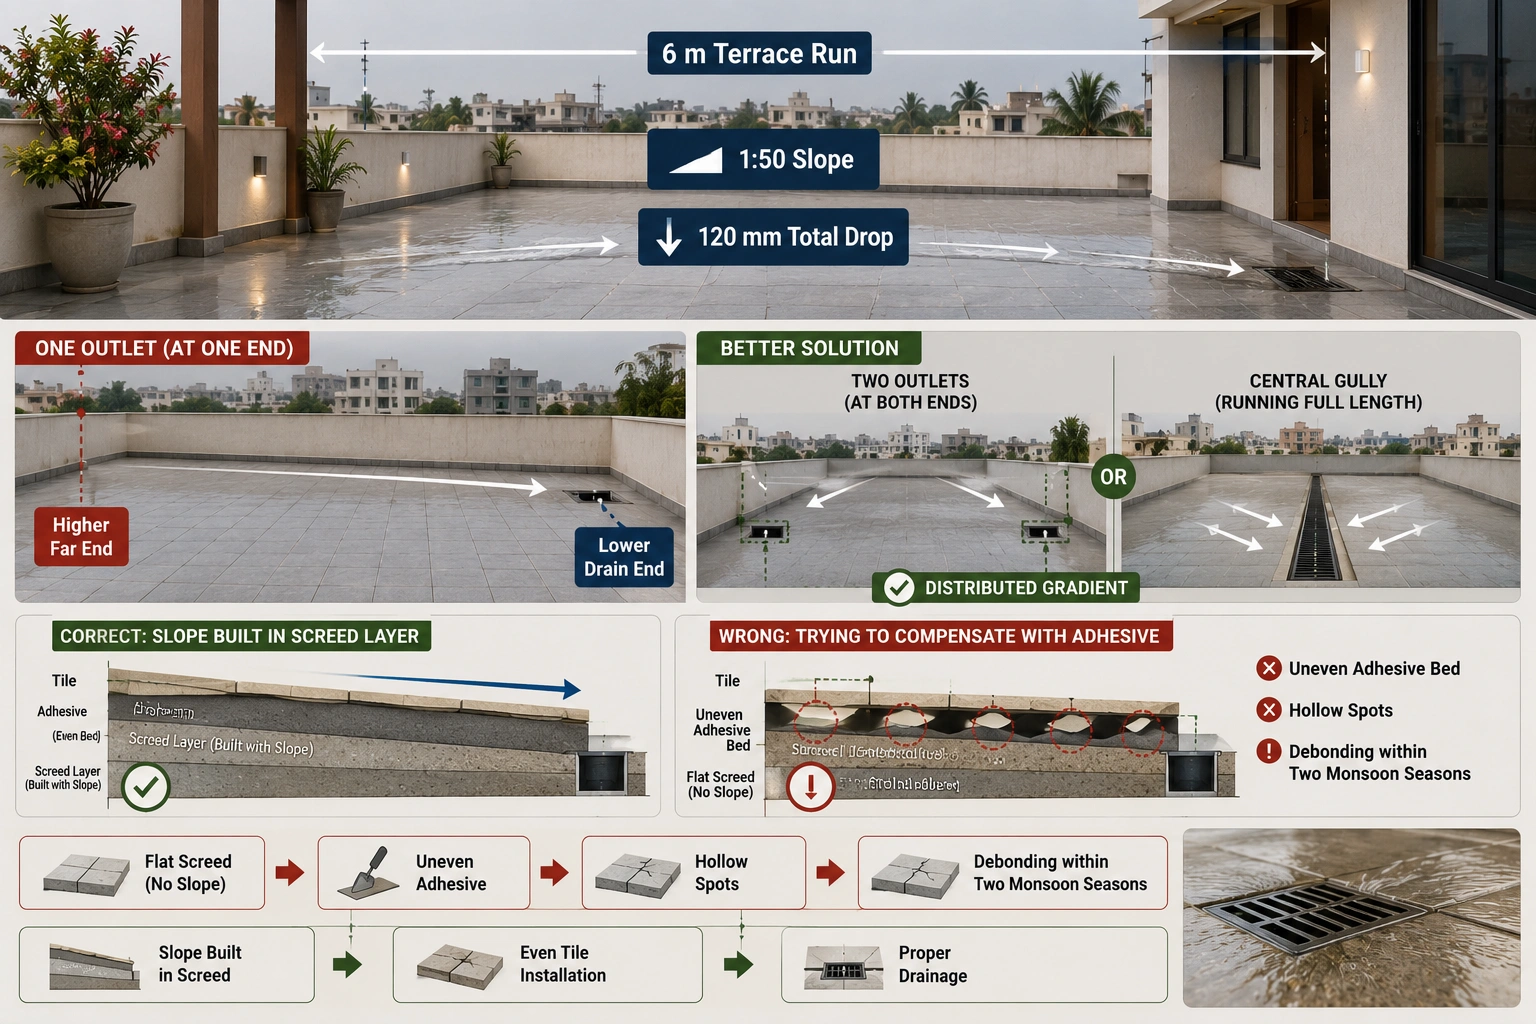
For a 6-metre terrace run, a 1:50 slope gives a 120 mm total drop. That is significant. If your outlet is only at one end, the far tiles will sit noticeably higher than the drain end. In large terraces above 5 metres wide, using two drainage outlets (one at each end sloping toward the centre, or one central gully running the full length) distributes the gradient and avoids extreme height differences.
The screed layer is where the slope is built. Tile layers should not try to compensate for a flat screed by varying adhesive thickness. Uneven adhesive beds lead to hollow spots and debonding within two monsoon seasons.
Tile Types That Work for Drainage-Ready Outdoor Floors
Not every tile category suits outdoor drainage conditions. The combination of moisture, temperature cycling, and foot traffic under wet conditions narrows the choice considerably.
Anti-Skid Vitrified Tiles for Terraces and Balconies
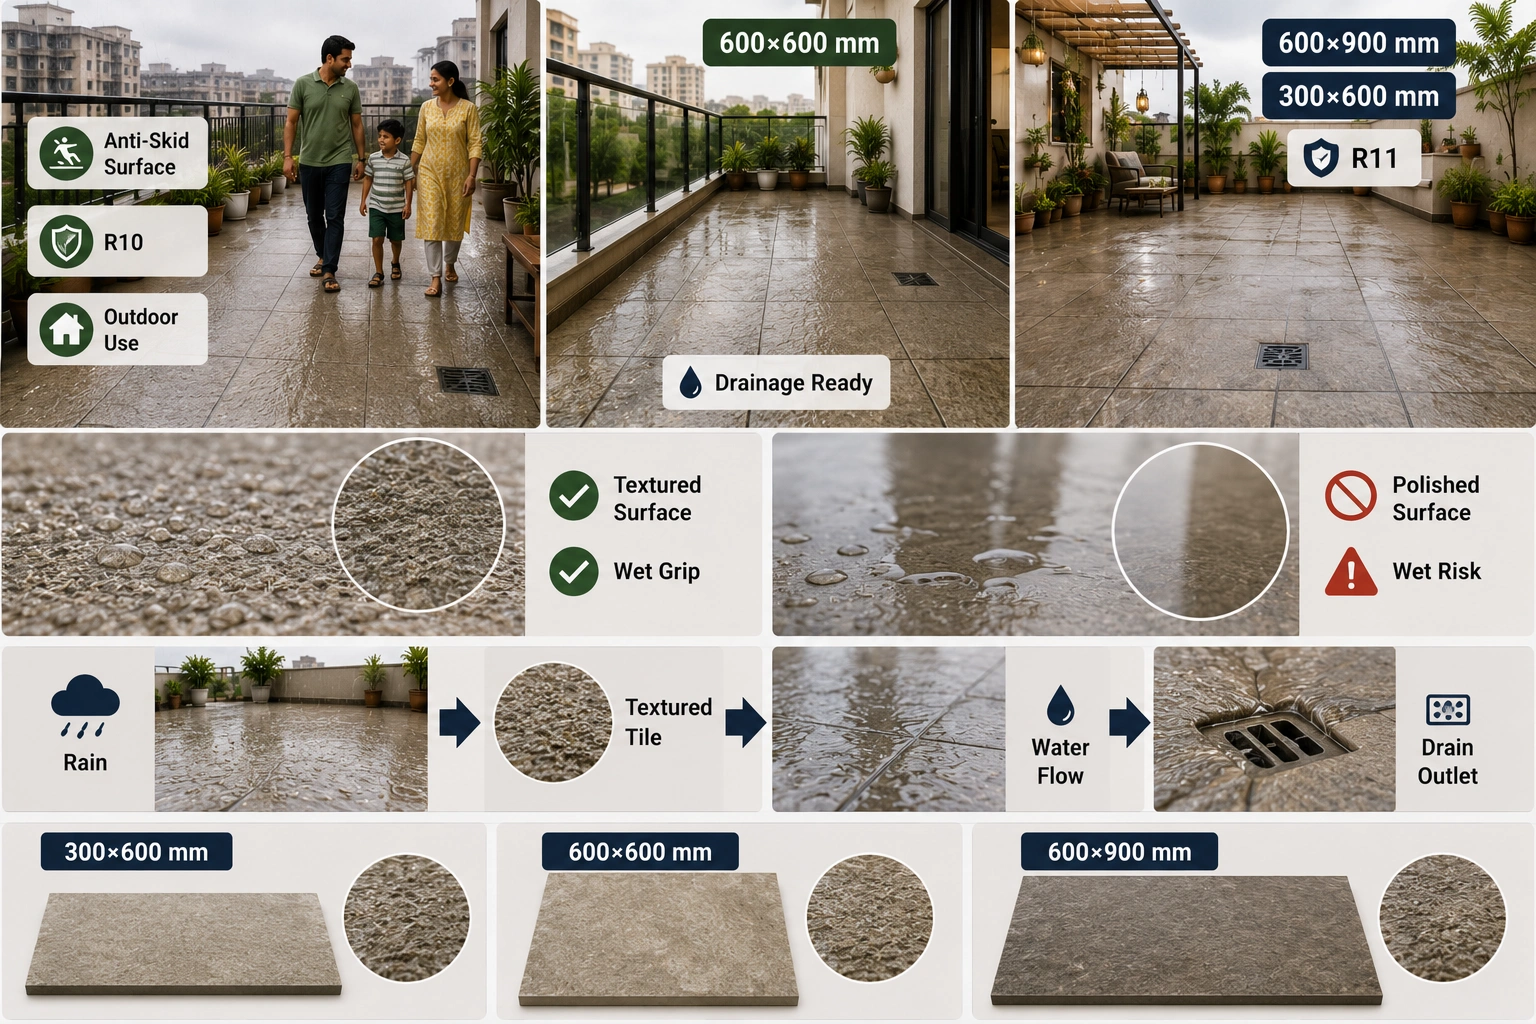
Full-body vitrified tiles with a matt or textured surface and a COF (coefficient of friction) rating above 0.6 wet are the standard choice for outdoor residential terraces and balconies. Sizes commonly used are 600x600 mm, 600x900 mm, and 300x600 mm.
The key distinction for drainage conditions is surface texture. A polished vitrified tile becomes dangerous when wet, regardless of how well the slope is set. Choose tiles labelled with R10 or R11 slip-resistance rating for outdoor use. Morbi manufacturers produce a wide range of these specifications, many available through TilesFinders sourcing.
Parking Tiles and Their Drainage Profile
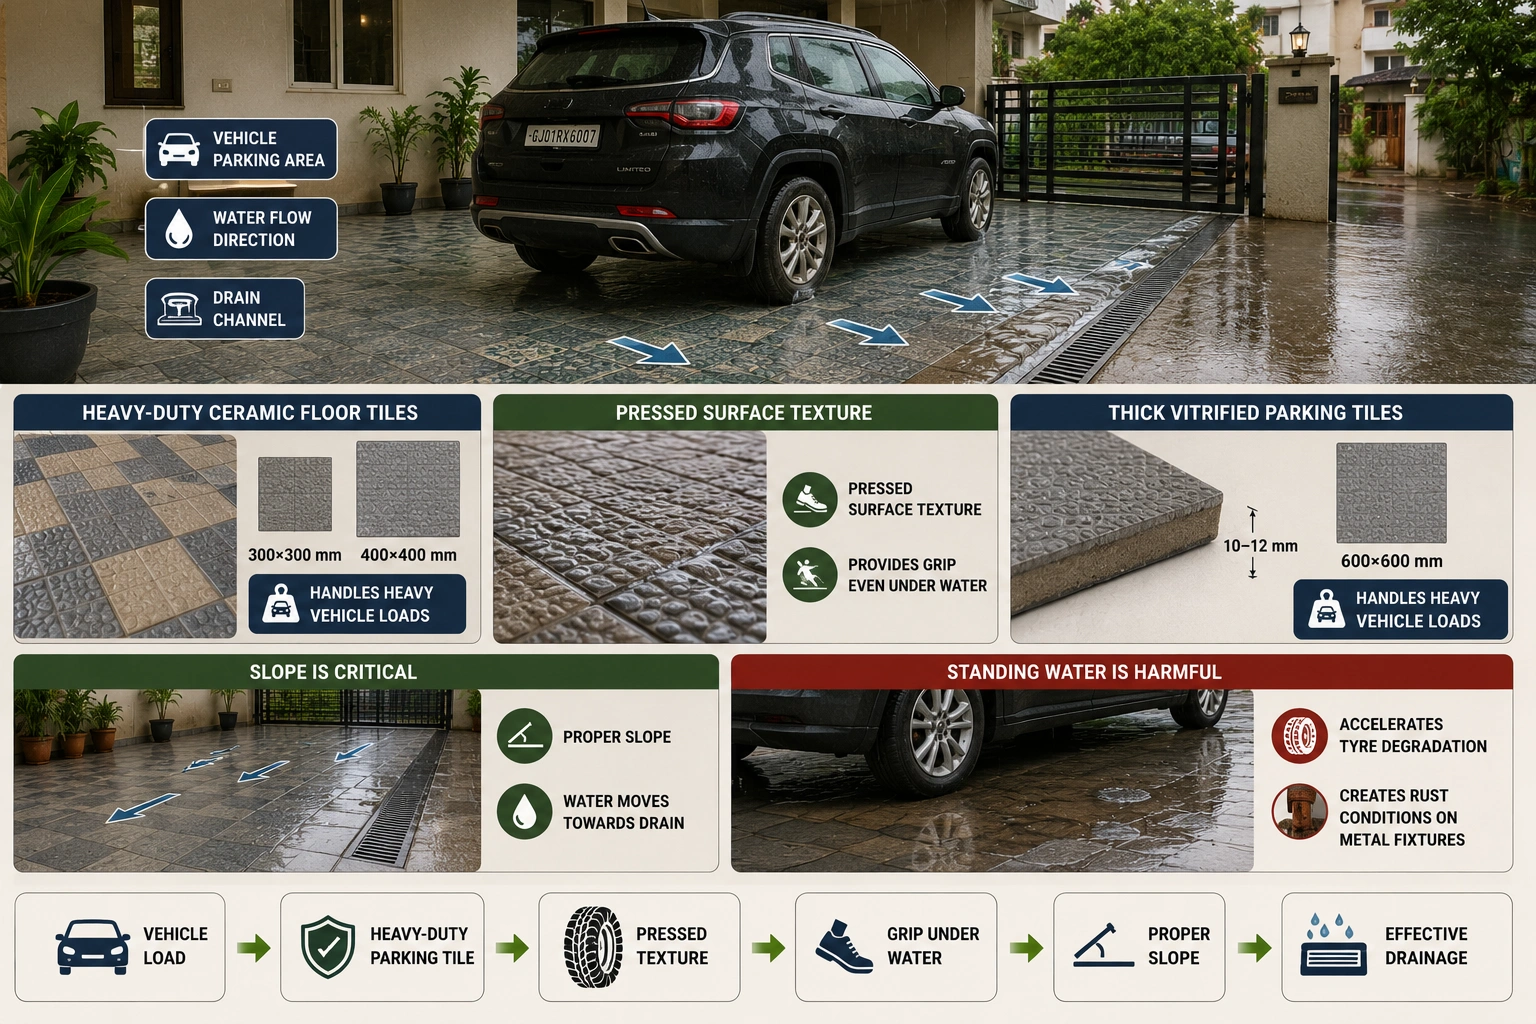
Parking areas need a harder tile category than standard terrace vitrified. Heavy-duty ceramic floor tiles in 300x300 mm or 400x400 mm, or thick vitrified parking tiles in 600x600 mm at 10-12 mm thickness, handle vehicle loads without cracking.
Parking tiles typically carry a pressed surface texture that provides grip even under water. The slope here is critical because standing water under vehicles accelerates tyre degradation and creates rust conditions on metal fixtures.
Ceramic vs Vitrified for Wet Outdoor Areas
| Property | Ceramic | Vitrified |
| Water absorption | 3-6% | Less than 0.5% |
| Surface hardness | Moderate | High |
| Frost resistance | Low | High |
| Weight load capacity | Moderate | High |
| Best outdoor use | Covered patios in dry zones | Open terraces, parking, and balconies |
Ceramic tiles are not recommended for open terraces in high-rainfall zones. Their water absorption rate causes gradual weakening under repeated wetting and drying. Vitrified tiles, with absorption below 0.5%, shed water from the body and resist the freeze-thaw stress that North Indian winters can introduce.
Drainage Channel and Gully Planning Before Tile Laying
Slope direction is only useful if the water has somewhere to go once it reaches the low point. Drainage channel planning must happen at the civil stage, before screed or tile work begins.
Where to Position the Drainage Outlet
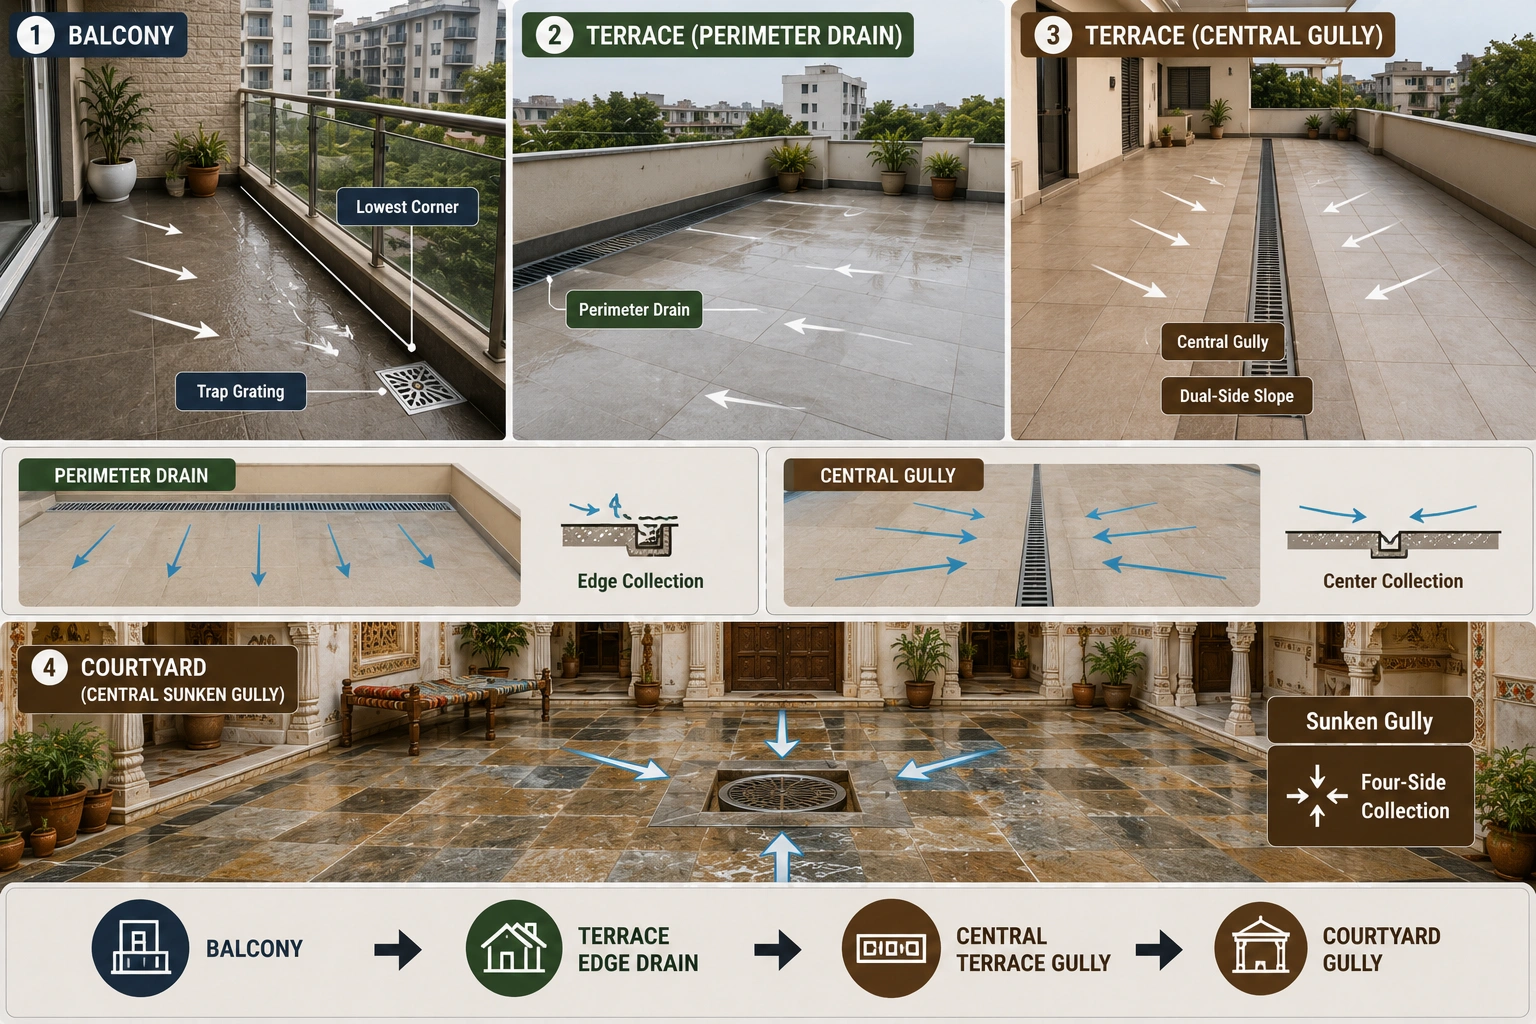
On a balcony, the outlet typically sits at the outer edge, the lowest corner, covered with a trap grating. The trap prevents insects and debris from entering the drain pipe while allowing water to pass through.
On a terrace, two layout options are common. The first is a perimeter drain running along one or two edges. The second is a central gully running across the middle of the terrace, with tiles sloping inward from both sides. The central gully option works well for long rectangular terraces above 6 metres.
In courtyard designs common in Gujarat and Rajasthan homes, a central sunken gully with stone or ceramic coping collects water from all four sides. This is an effective layout for large open areas and traditional architecture.
Linear Drains vs Point Drains for Terraces
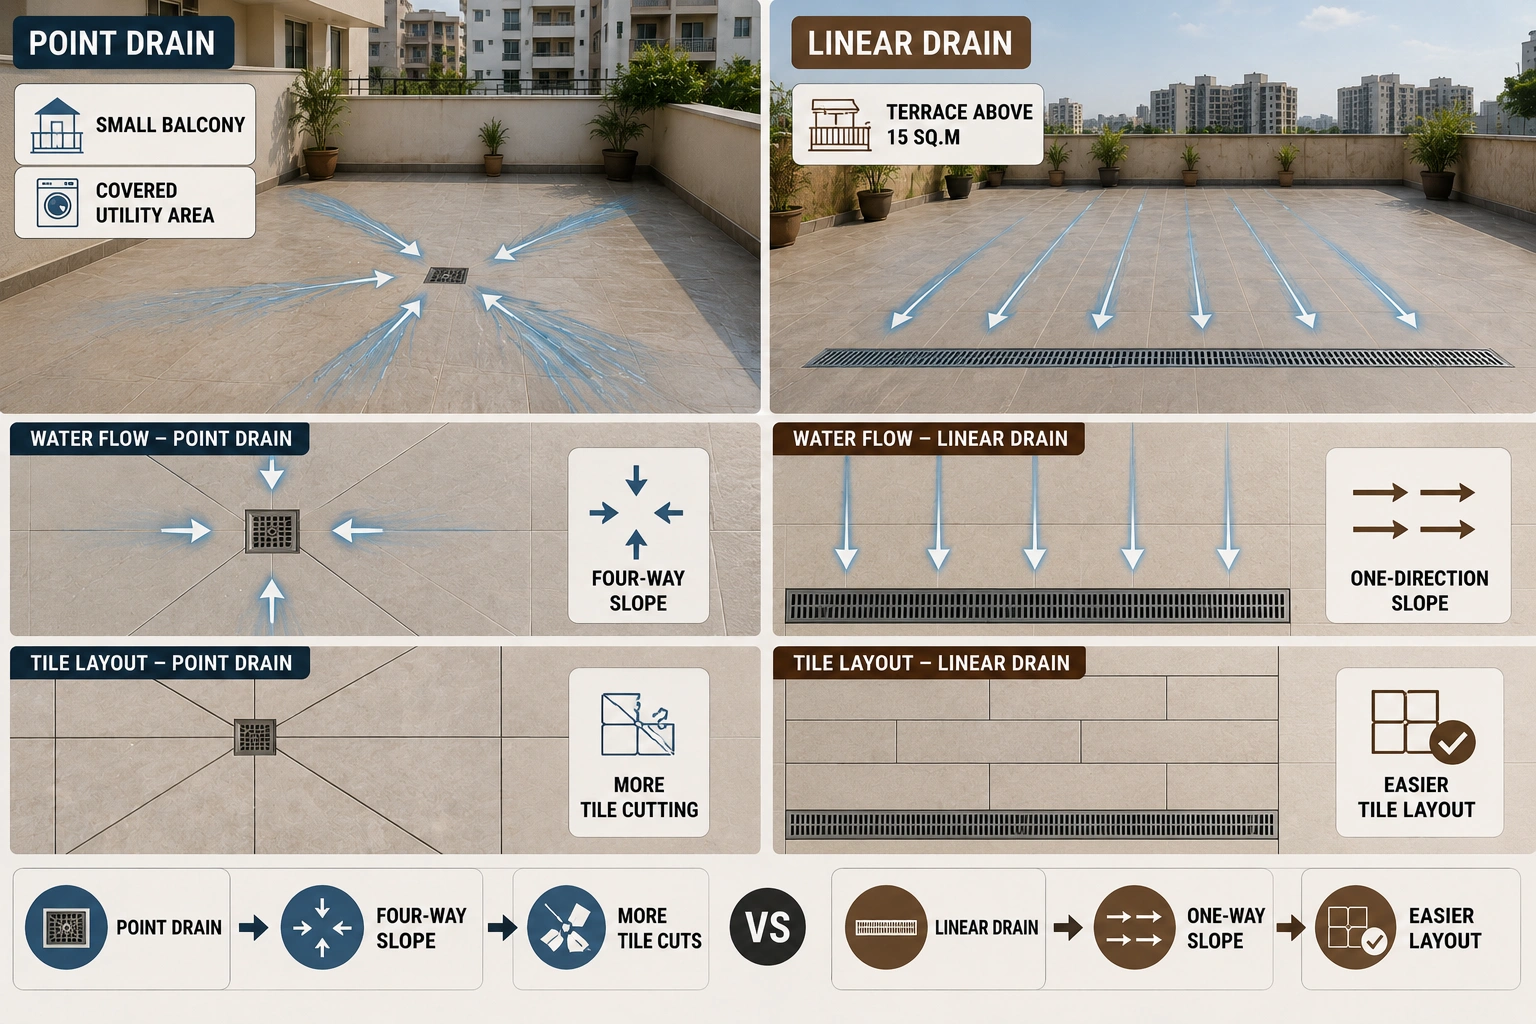
A point drain is a single circular or square outlet at the lowest point. It works well for small balconies or covered utility areas. A linear drain is a slot drain running across a section of floor, capturing water across its full length rather than at a single point.
For terraces above 15 square metres, a linear drain performs better. It allows a simpler one-direction slope rather than a four-quadrant slope toward a single central point. The tile cutting and slope creation are also easier to execute accurately with a linear drain layout.
Waterproofing the Substrate Before Outdoor Tile Work
Slope alone does not protect the structure below. In Indian construction, concrete roof slabs and balcony cantilevers need a waterproofing membrane below the tile bed to stop any residual moisture from penetrating the structural slab.
Membrane Waterproofing and Its Role Under Tile Beds
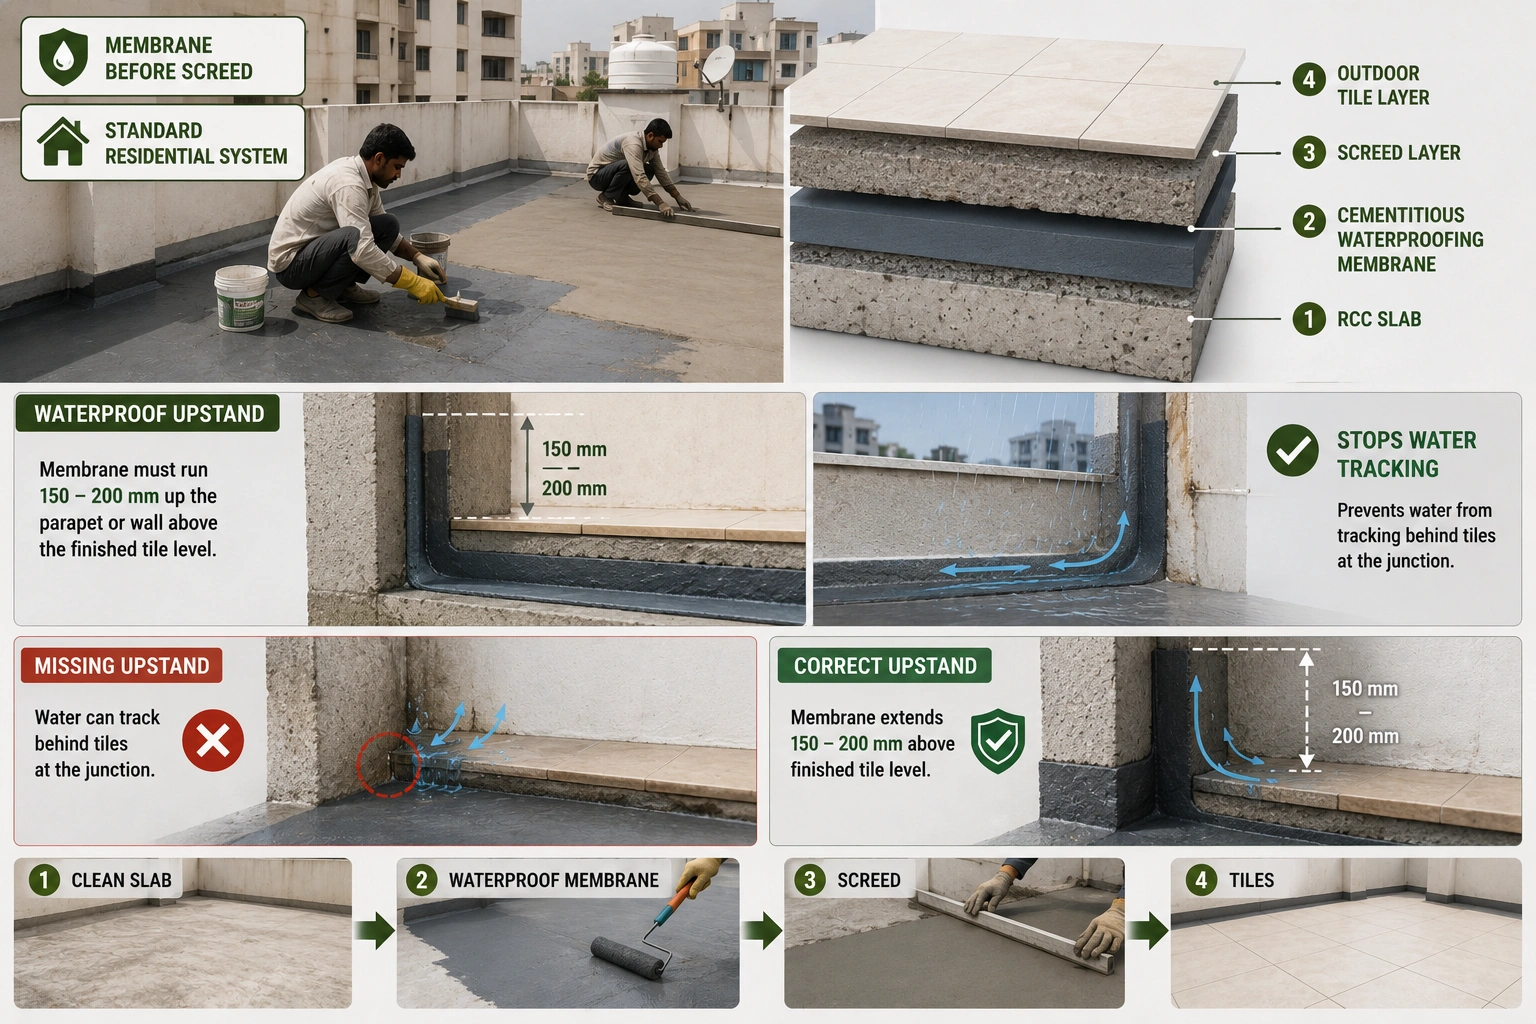
The two common systems in India are cementitious crystalline waterproofing and APP/SBS bituminous membrane. For residential terraces and balconies, a cementitious two-component system applied over the cleaned slab surface is the standard approach.
The membrane must be applied before the screed. It needs to run 150-200 mm up the parapet or wall above the finished tile level to prevent water from tracking behind tiles at the junction. Missing this upstand is one of the most common waterproofing failures on Indian terraces.
Screed Layer Thickness and Slope Creation
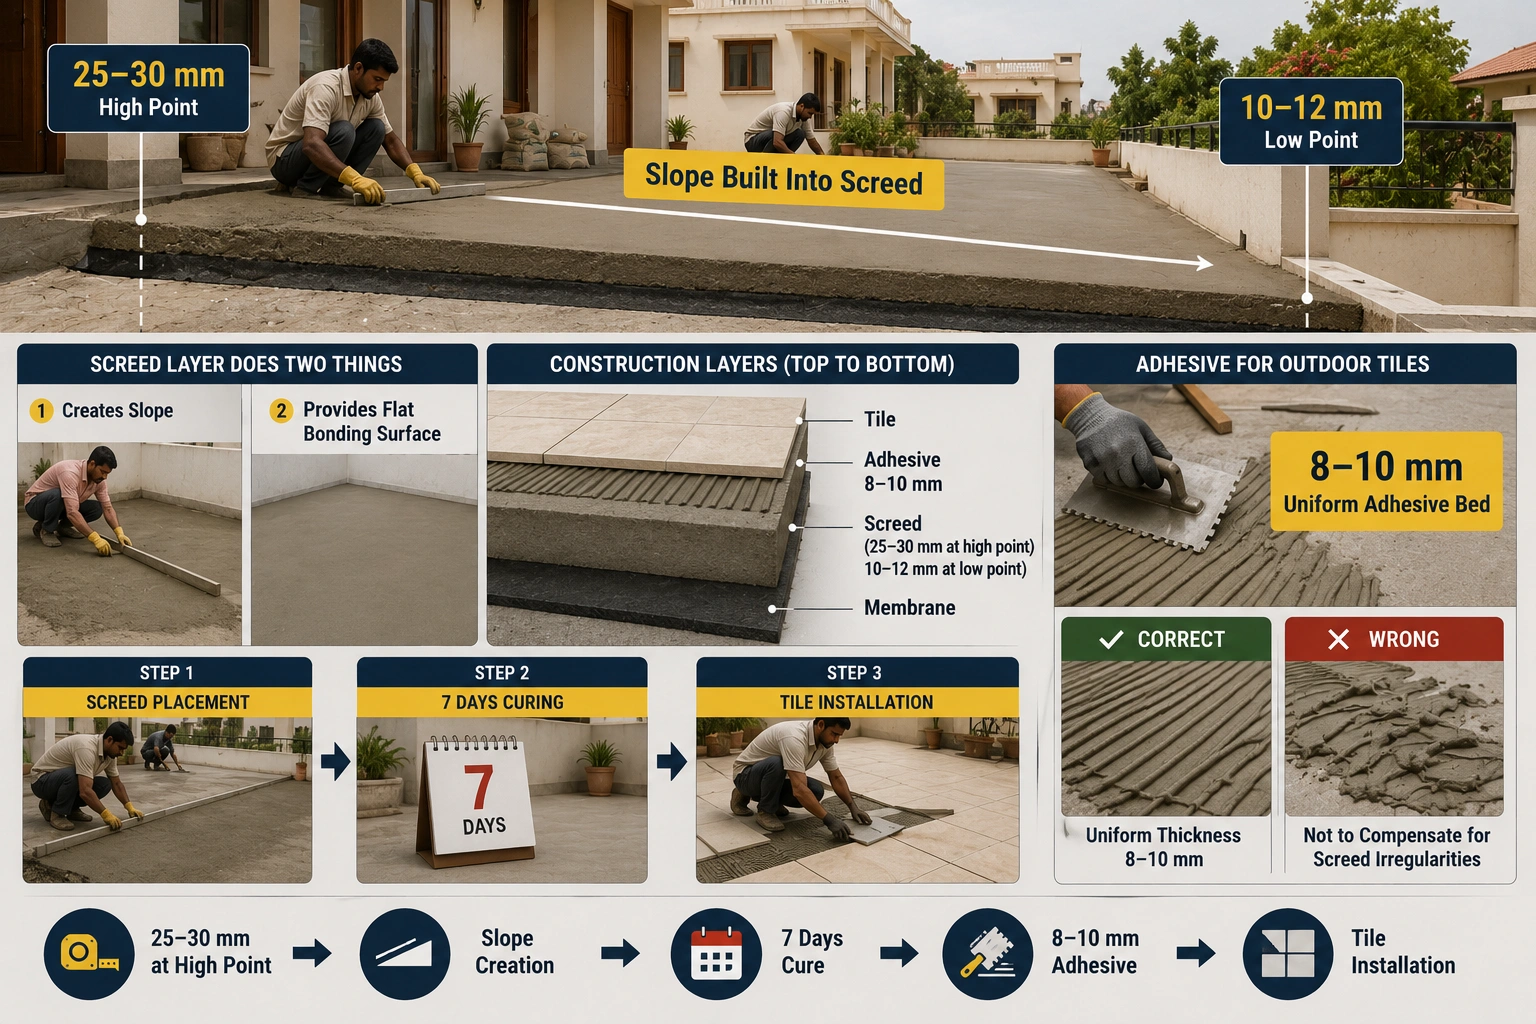
The screed layer (typically a 1:4 cement-sand mix) sits above the membrane. This layer does two things: it creates the slope and provides the flat bonding surface for the tile adhesive above.
Minimum screed thickness at the highest point should be at least 25-30 mm to maintain structural integrity. At the low point, it can reduce to 10-12 mm. The slope is designed into the screed from the start. After curing the screed for at least 7 days in the Indian climate, tile work can begin.
Using a rapid-set polymer-modified adhesive for outdoor tiles is standard practice. Normal cement adhesive can weaken in repeated wetting. The adhesive bed thickness for outdoor tiles should be kept uniform at 8-10 mm, and not used to compensate for screed irregularities.
Common Mistakes in Outdoor Tile Slope Setup
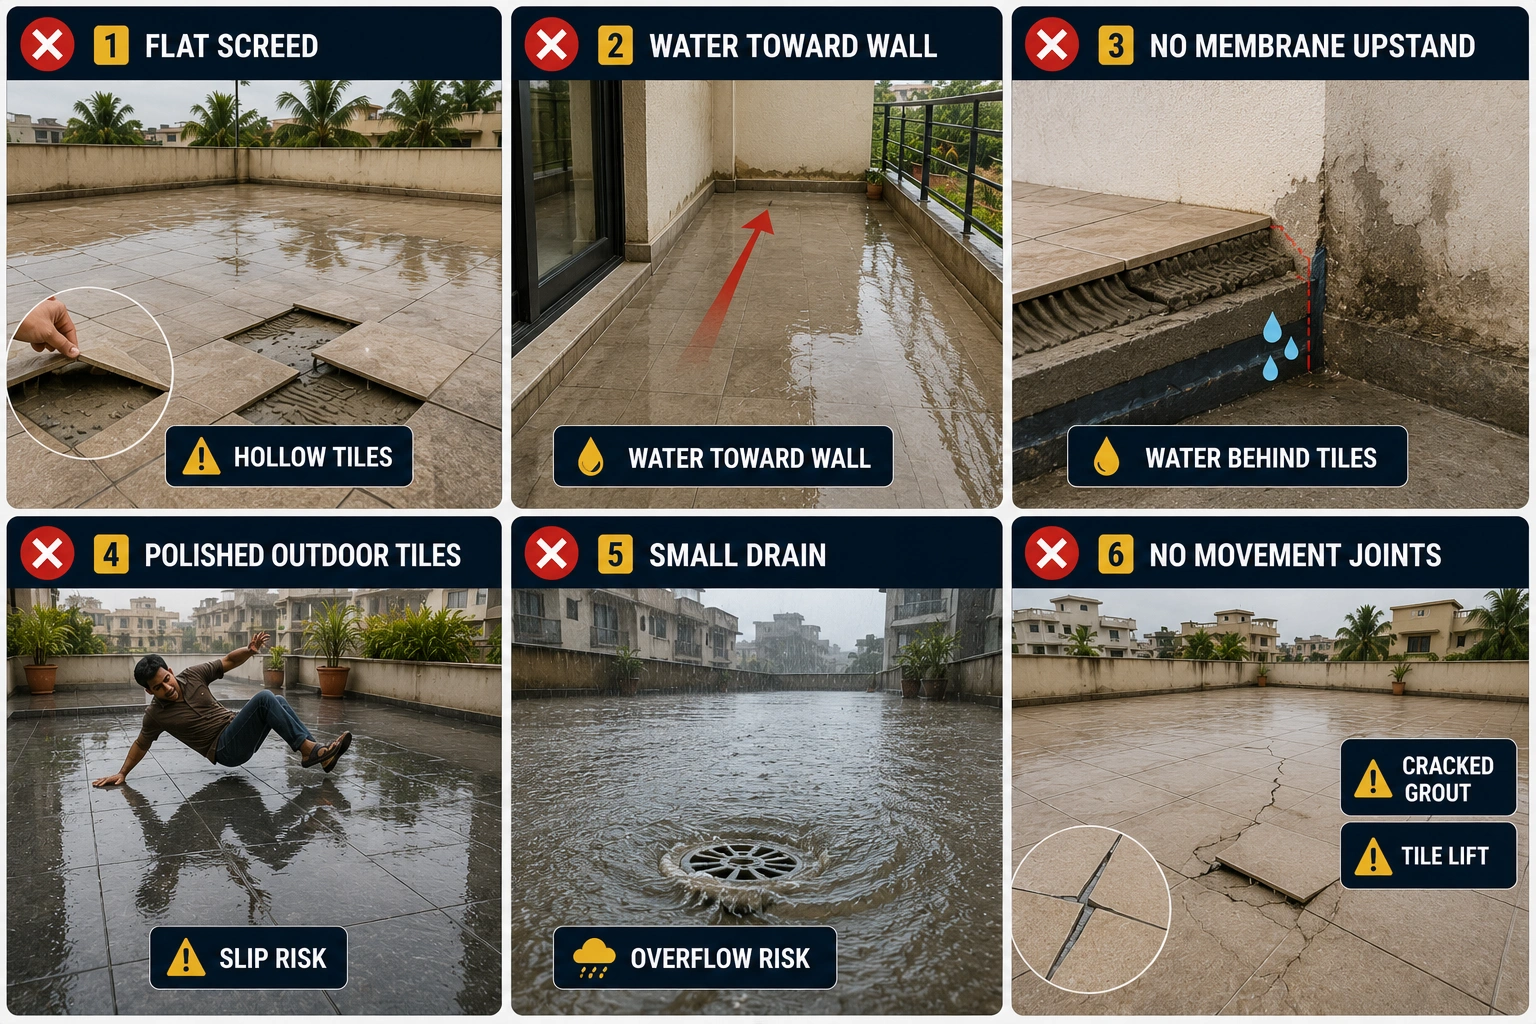
Tiling over a flat screed. Slope must come from the screed, not the adhesive. Tiles laid on a flat screed with varying adhesives to create a slope will develop hollow spots and lift within one to two monsoon cycles.
Slope pointing toward the wall. This sounds obvious, but it happens frequently in contractor errors. When tiling a balcony, confirm that the string line check shows slope running toward the outer edge, not inward toward the building wall.
No upstand on waterproofing membrane. The membrane needs to continue up the wall. Without this, water tracks behind the tile-to-wall junction and causes plaster damage, efflorescence, and eventual seepage inside the room.
Using polished tiles outdoors. Any polished surface, whether ceramic or vitrified, is unsafe when wet. Always specify a textured or matt finish with stated slip resistance for outdoor areas.
Undersized drain outlet. A single 100 mm round trap drain on a 20-square-metre terrace cannot handle peak monsoon runoff. Size the drain outlet to match the expected water volume. Linear drains or larger-diameter traps (150 mm or more) serve bigger terraces better.
Grouting without movement joints. Outdoor tiles expand and contract with temperature. Without expansion joints at perimeter edges and at 3-4 metre intervals in larger areas, grout cracks and tiles can pop. Use a flexible sealant at junctions rather than rigid grout.
Expert Tips for Monsoon-Ready Outdoor Tiles

Installing outdoor tiles correctly is as much about what happens before tiling as the tiling itself. A few practices make a significant difference.
Use a spirit level and string lines, not eye judgment. Slope errors that look minor at installation show up clearly after the first monsoon rain as puddles or dry patches.
Check the slope with a water test before grouting. Pour a bucket of water at the high point before the grout goes in. The flow direction tells you whether the slope is correct. Fixing slope errors is much easier at this stage than after grouting.
Opt for epoxy grout for outdoor joints. Standard cement grout absorbs water and grows algae in outdoor conditions. Epoxy grout is non-porous and resists biological growth, staining, and chemical exposure from rainwater and bird droppings. The cost difference over the tile area is small relative to the maintenance savings over ten years.
Clean tiles before adhesive bonding. Construction dust on the back of tiles reduces adhesive contact area. Back-butter the tile and the substrate for full-coverage bonding in outdoor conditions.
Account for thermal expansion in large-format tiles. Tiles above 600x600 mm expand more noticeably in India's temperature swings (5-45 degrees Celsius in many cities). Use slightly wider grout joints of 3-4 mm for these formats outdoors, and seal perimeter joints with silicone.
Find the Right Outdoor Tiles on TilesFinders
Choosing tiles with the correct slip rating, body type, and size for your outdoor space is easier when you have the right sourcing options. TilesFinders connects buyers directly with manufacturers in Morbi, Gujarat, where the majority of India's vitrified and ceramic outdoor tiles are produced.
Whether you are tiling a terrace in Mumbai, a parking bay in Ahmedabad, or a courtyard in Jaipur, the tile range available on TilesFinders covers the full outdoor specification from 300x300 mm heavy-duty parking tiles to large 600x900 mm matt vitrified terrace tiles. You can browse by finish, size, and category to shortlist what fits your drainage layout and project budget.
FAQs
For open terraces and balconies, a 1:50 to 1:80 slope is the standard range. High-rainfall coastal zones (Mumbai, Kochi, Chennai) should use 1:50 to 1:60. A 1:80 slope works for covered parking or dry-zone locations. The slope is created in the screed layer, not by varying the adhesive thickness.
Full-body vitrified tiles with a textured or matt surface and a COF above 0.6 wet are the practical choice. Look for tiles with R10 or R11 slip resistance and water absorption below 0.5%. Avoid polished vitrified or polished ceramic tiles for any open outdoor area.
Three things together prevent waterlogging: a correctly sloped screed (1:50 to 1:80), a properly placed drain outlet at the lowest point, and a waterproofing membrane below the screed that runs up the walls 150-200 mm. All three must be in place. Slope alone, without a functioning drain outlet, does not solve waterlogging.
Ceramic tiles with high water absorption (3-6%) are not suitable for open terraces in heavy-rainfall zones. They can be used in covered outdoor areas in dry climates. For open exposure in monsoon-heavy regions, vitrified tiles are the safer long-term choice due to their low absorption and higher surface hardness.
For standard 600x600 mm outdoor tiles, a 3 mm grout joint is the minimum. For tiles above 600x600 mm, use 3-4 mm joints to allow for thermal expansion. At perimeter edges and at every 3-4 metres of open tiled area, replace rigid grout with a silicone-based flexible sealant. Epoxy grout is recommended over cement grout for all outdoor joints in India.
A point drain is a single outlet at the lowest corner, suitable for small balconies under 10 square metres. A linear drain is a slot running across the floor, catching water along its length. Linear drains allow a simpler one-direction slope and handle higher water volumes better. They are the preferred option for terraces above 15 square metres.
If the patio is at ground level with soil below, a waterproofing membrane is less critical but still useful to prevent capillary moisture from rising through the screed. If the patio sits above a basement, habitable room, or car park below, a waterproofing membrane under the screed is mandatory.