How to Clean Parking Tiles: Removing Oil Stains, Tyre Marks and Algae in India
June 12, 2026 20
Learn how to clean parking tiles, remove oil stains, tyre marks, algae, moss, and hard water deposits using safe methods for vitrified and natural stone surfaces.
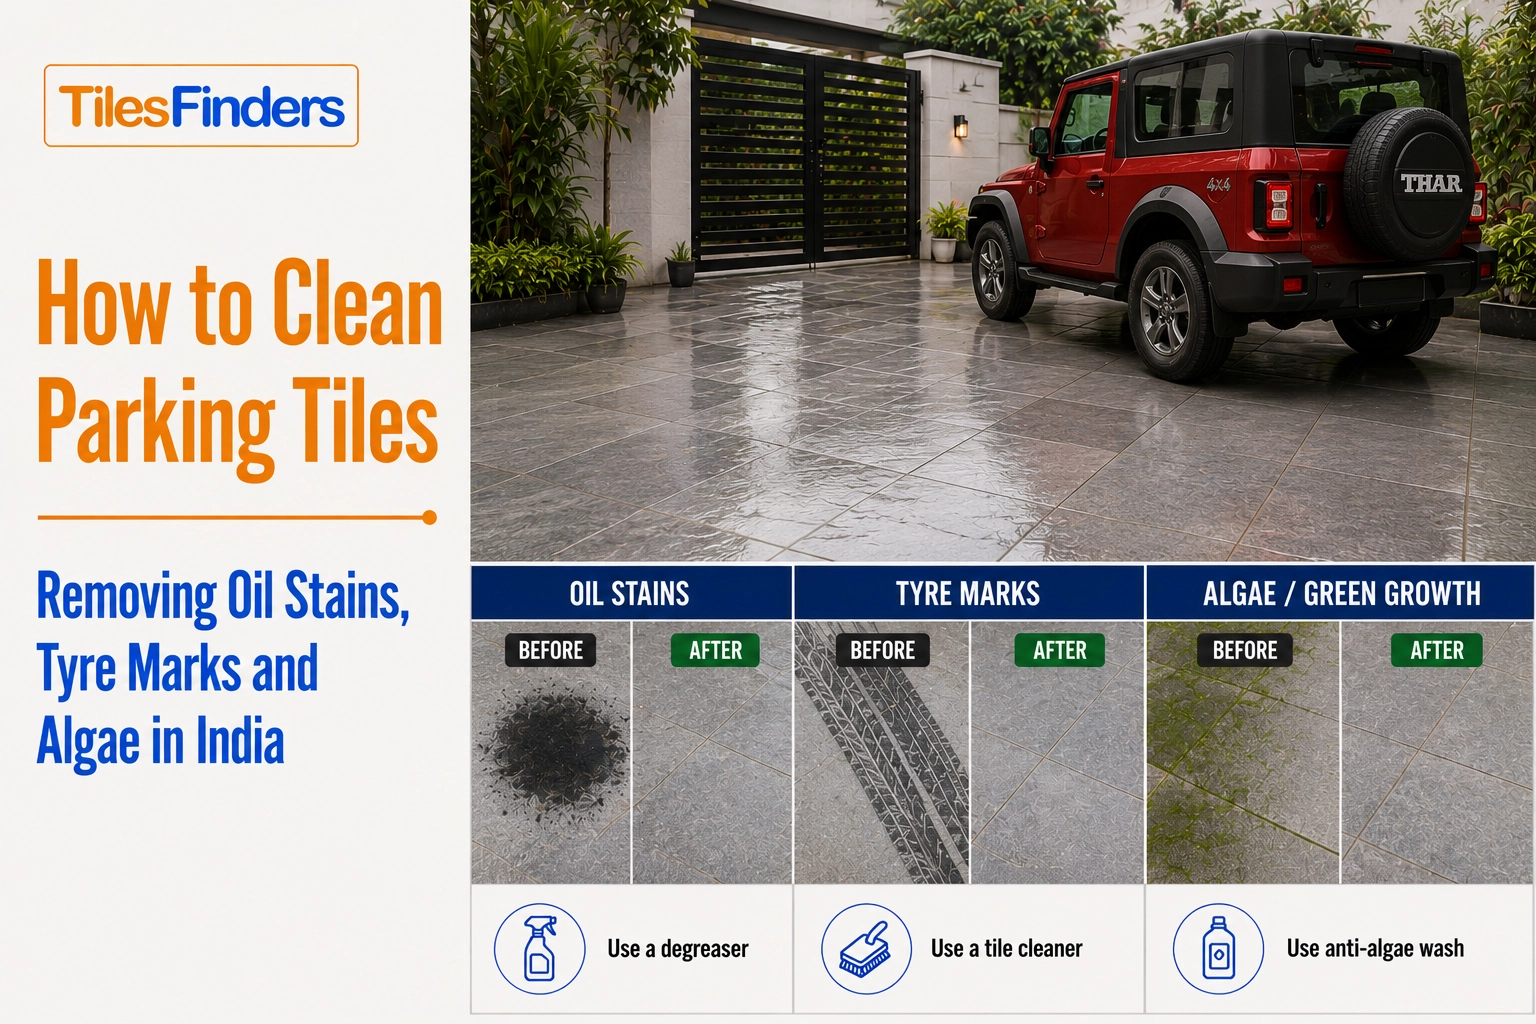
Parking tiles face oil spills, tyre marks, algae growth, moss, and hard water deposits that require different cleaning methods. Use alkaline degreasers for oil, solvent-based cleaners for tyre marks, diluted bleach for algae, and mild acid-based cleaners only on vitrified tiles for calcium deposits. Avoid diesel, petrol, metal scrubbers, and acids on natural stone.
A parking tile looks its worst not because it is old but because it has not been cleaned in the right sequence with the right products. Most Indian driveways accumulate four types of stains: engine oil from parked vehicles, black tyre marks from braking and turning, green algae after monsoon, and white calcium crust from hard water supply lines or overhead tank overflow. Each of these stains needs a different approach.
Using the wrong product makes the situation worse. Acids on natural stone cause permanent etching. Bleach on coloured grout strips the pigment. Abrasive scrubbers on PGVT or high-gloss surfaces leave permanent scratches. These are not edge-case mistakes. They happen in Indian homes regularly because no one explains which product is safe on which surface before the cleaning starts.
This guide covers every common parking tile stain found in Indian conditions, the correct removal method for each, what to avoid, and how tile finish type changes the approach. There is also a seasonal cleaning calendar at the end because the Indian climate creates four distinct maintenance windows that each require different work.
Why Parking Tiles Need a Different Cleaning Approach Than Indoor Tiles
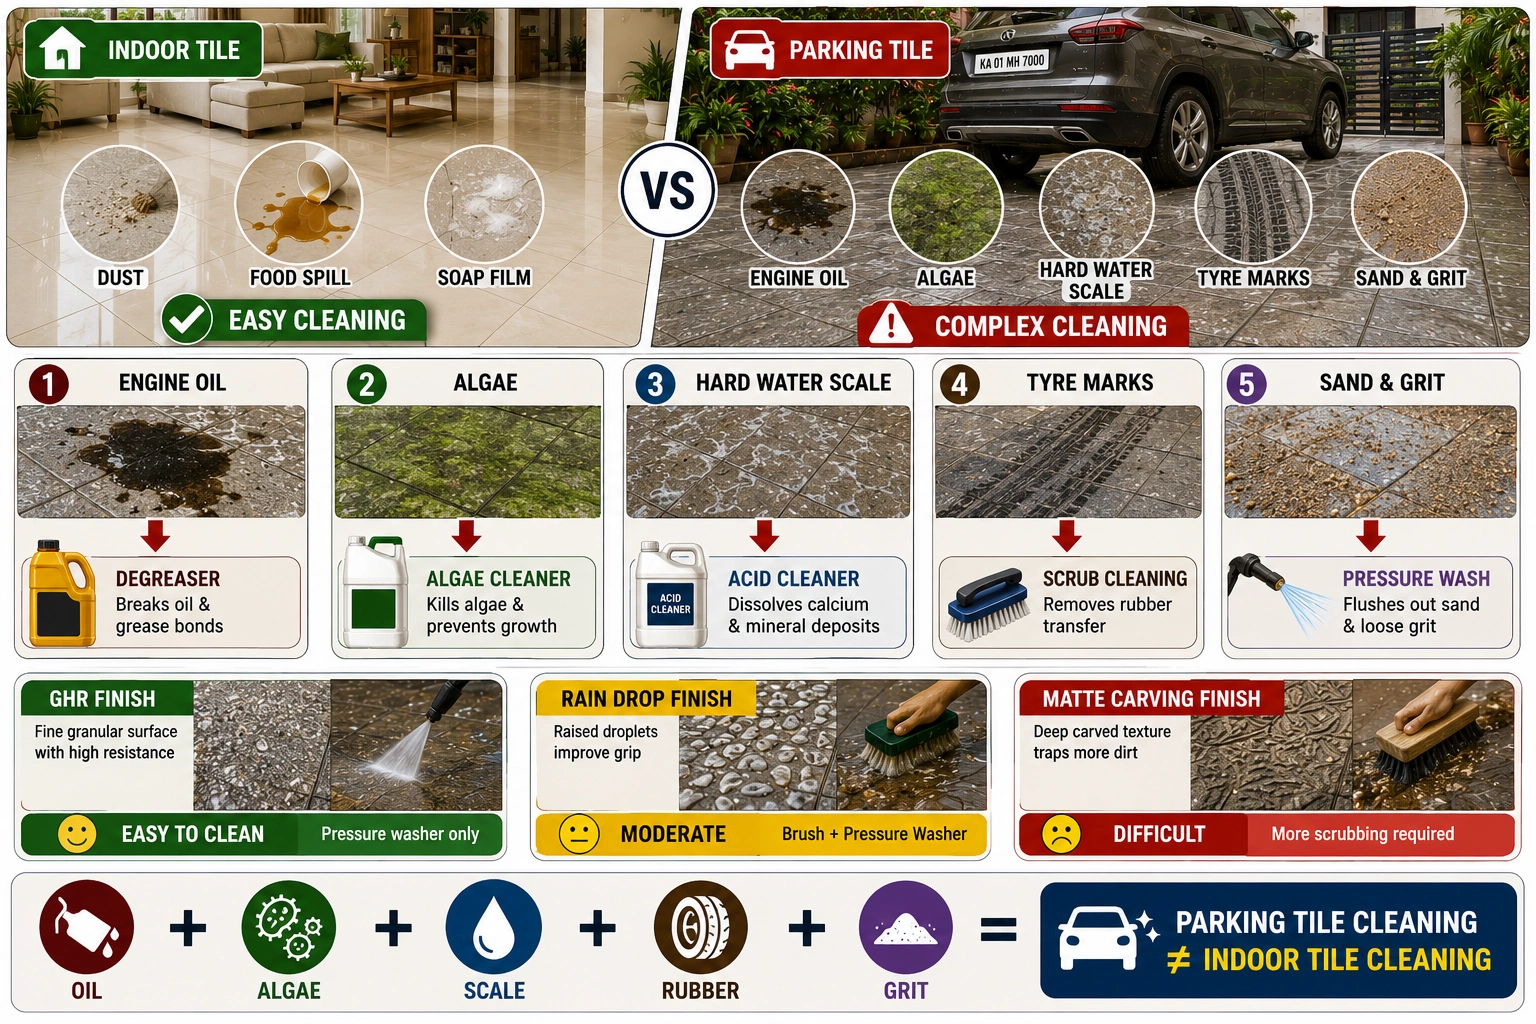
Indoor tiles deal with dust, soap film, and occasional food stains. Parking tiles deal with hydrocarbon compounds from vehicle engines and exhaust, biological growth that establishes itself in weeks during monsoon, mineral deposits from water with high calcium and magnesium content, rubber transfer from tyre compounds at high temperature, and grit and sand that acts as an abrasive under foot and tyre traffic.
Each of these has a different chemistry from the stains on indoor tiles. Hydrocarbon oil bonds to tile surfaces through a different mechanism than food grease and needs a petroleum-based or alkaline degreaser to break it. Algae is a living organism that continues growing unless the tile pH is changed or the cells are killed. Calcium deposits are mineral scale that requires acid-based treatment to dissolve.
The other major difference is surface texture. Parking tiles in India commonly have GHR, rain-drop, or matte carving finishes. These textures trap staining material in their grooves and nodule valleys in ways that smooth indoor tiles do not. Effective cleaning of textured outdoor tiles requires both the right chemistry and the right physical agitation method.
Maintenance challenges are often linked not only to the tile surface but also to the manner in which the driveway was constructed. A well-designed base, correct slope, and proper drainage all reduce standing water, algae growth, and dirt accumulation, making this Parking Tile Installation Guide a valuable resource for long-term maintenance planning.
What You Need Before You Start: Tools and Cleaning Agents
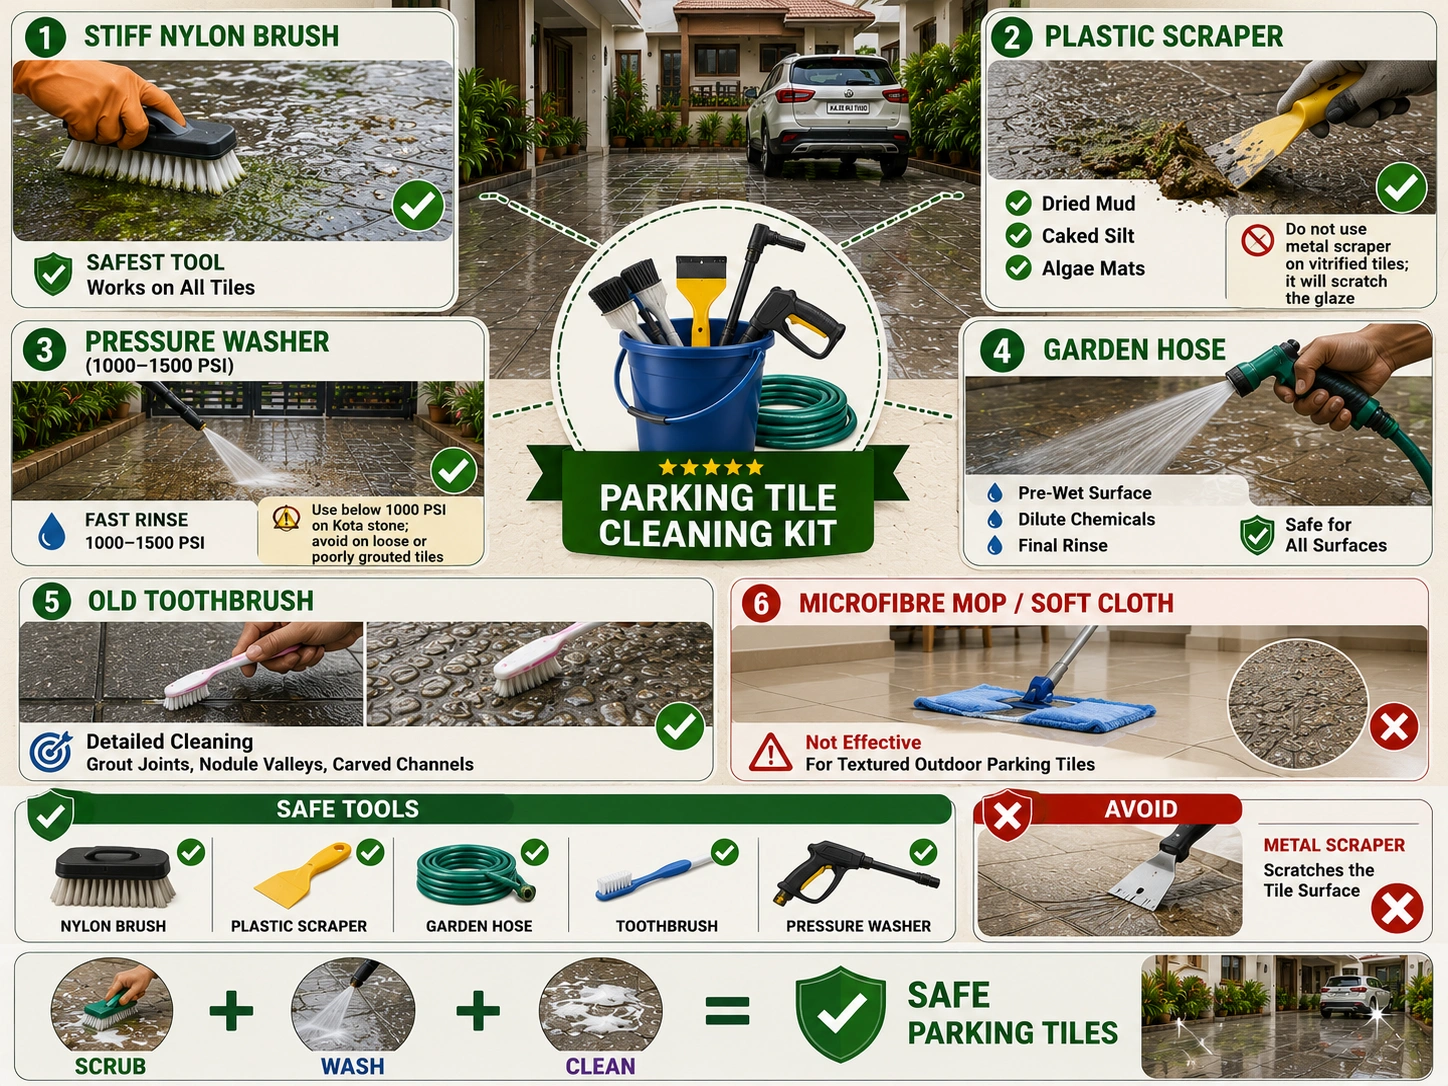
Safe Cleaning Tools for Parking Tiles
| Tool | Use | Safe For | Avoid On |
|---|---|---|---|
| Stiff nylon-bristle brush | Scrubbing textured surfaces, grout joints, and algae | All tile types, including natural stone | Nothing; this is the safest scrubbing tool |
| Plastic scraper or putty knife | Lifting dried mud, caked silt, thick algae mats | All tile types, when used flat and gently | Do not use a metal scraper on vitrified tiles; it will scratch the glaze |
| Pressure washer (1,000 to 1,500 PSI) | Rinsing loose silt, post-algae flush, post-scrub rinse | GVT matte, GHR, rain-drop, Full Body vitrified | Use below 1,000 PSI on Kota stone; avoid on loose or poorly grouted tiles |
| Garden hose with nozzle | Pre-wet surface, dilute chemicals, final rinse | All surfaces | No restrictions |
| Microfibre mop or soft cloth | Applying a cleaning solution to smooth or polished surfaces | PGVT walls (if cleaning adjacent surfaces), porcelain | Not useful for textured outdoor parking surfaces |
| Old toothbrush or narrow brush | Cleaning grout joints, nodule valleys in rain-drop tiles, carved channels | All tile types | No restrictions |
Cleaning Agents That Work and Agents That Damage
Product selection is where most cleaning mistakes happen. The tile type and finish determine which chemicals are safe. A product that removes calcium scale from vitrified tiles can permanently etch Kota stone. A product that cleans algae from matte GVT can discolour cement grout.
| Cleaning Agent | What It Removes | Safe On | Not Safe On | Notes |
|---|---|---|---|---|
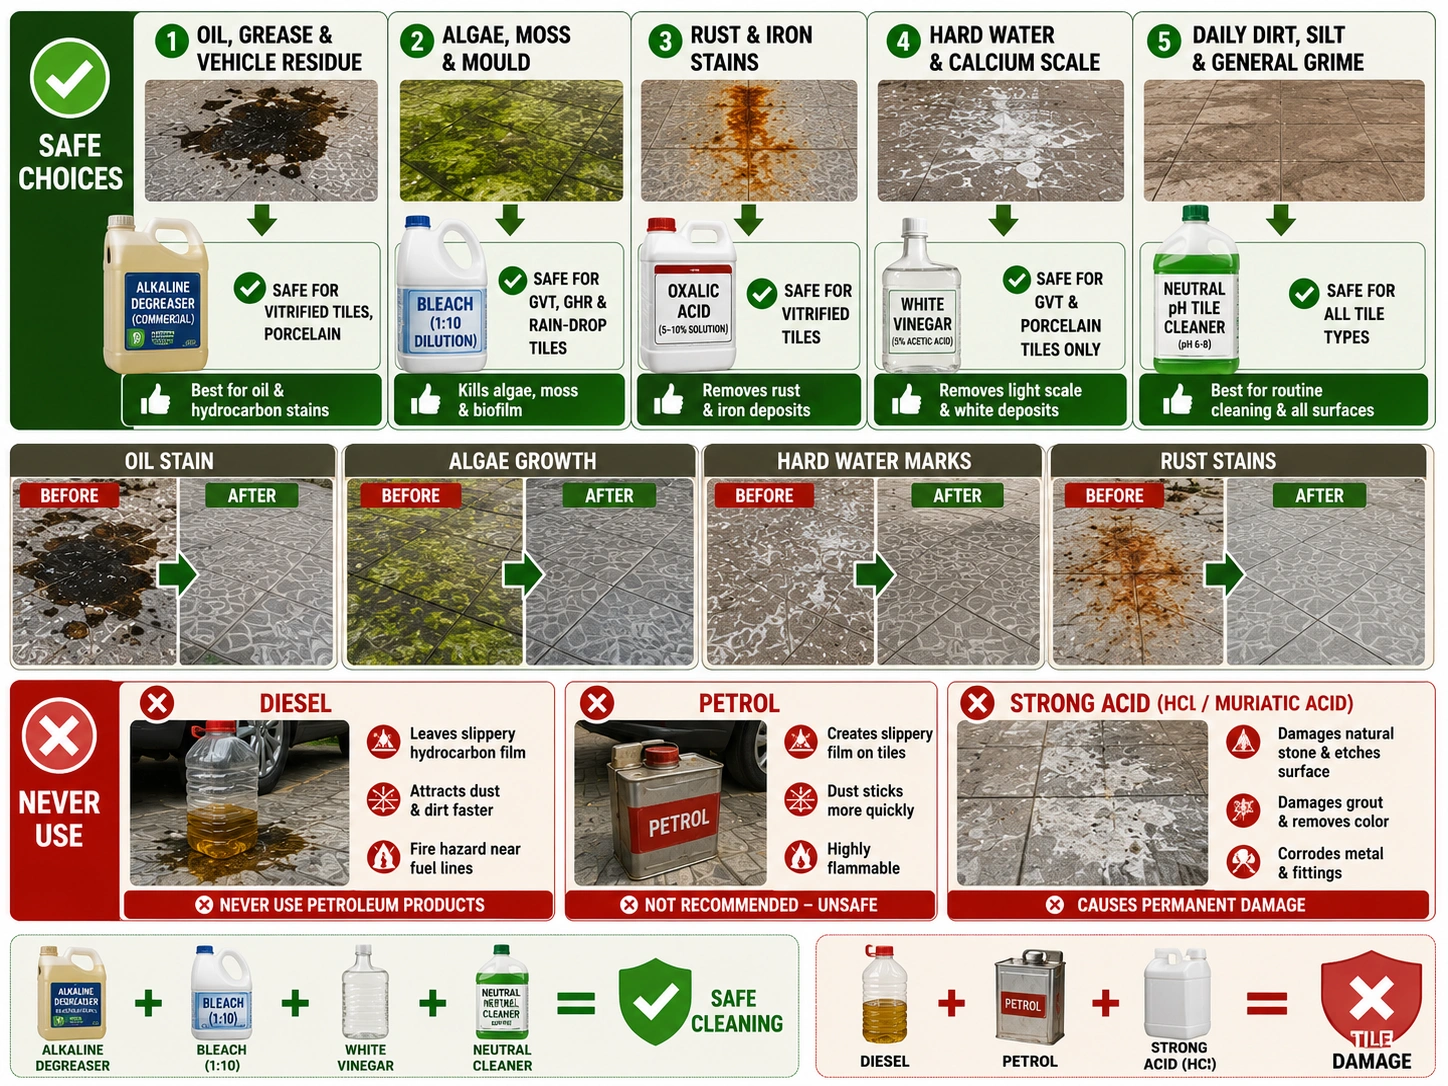
| Alkaline degreaser (commercial outdoor) | Engine oil, diesel, grease, vehicle residue | All vitrified tiles, porcelain | Natural stone (check pH; must be pH neutral or mildly alkaline) | Best choice for oil and hydrocarbon stains; available at hardware shops |
| Sodium hypochlorite (bleach) diluted 1:10 | Algae, moss, mould, biofilm | GVT matte, GHR, rain-drop vitrified | Coloured grout (strips pigment); natural stone; avoid metal fittings nearby | Dilute before use; rinse thoroughly; do not leave on surface more than 10 minutes |
| Oxalic acid solution (5 to 10% dilution) | Rust stains, iron deposits, and some organic stains | Most vitrified tiles at the correct dilution | Do not use on marble, Kota stone, or any calcium-based natural stone; it will etch | Wear gloves and eye protection; rinse completely after 5 minutes |
| White vinegar (5% acetic acid) | Light calcium and hard water deposits | Vitrified GVT and porcelain tiles only | Kota stone, marble, any limestone-based stone (permanent etching) | Dilute 1:1 with water; do not leave more than 5 minutes; rinse well |
| Neutral pH tile cleaner (pH 6 to 8) | Regular dirt, silt, and general grime | All tile types, including natural stone | No restrictions when used at the correct dilution | Best for routine cleaning and finish-safe maintenance; safest option for all surfaces |
| Baking soda paste | Light oil spots, surface grime on grout | All tile types | No restrictions | Mild abrasive; safe for most surfaces; works for spot treatment, not large areas |
| Diesel or petrol (NOT recommended) | Some contractors use this for tyre marks | None; not recommended | All tile types; leaves hydrocarbon film; creates a fire hazard | This is a common Indian field practice that causes more harm than good; never use it |
| Hydrochloric acid (HCl) or muriatic acid | Severe calcium scale, cement haze post-installation | Vitrified tiles only, with extreme caution at high dilution (1:10 or more) | Natural stone, marble, Kota stone; coloured grout; any metal nearby | Professional use only; causes permanent damage if misused; always rinse within 2 minutes |
Caution: Diesel and petrol are used by some Indian contractors and households as a quick fix for tyre marks. This practice leaves a thin hydrocarbon film across the entire cleaned area that makes the tile slippery, attracts dust faster, and is a fire hazard near vehicle fuel lines. Never use petroleum products to clean parking tiles.
How to Remove Oil and Engine Grease Stains from Parking Tiles
Oil stains are the most common and most permanent damage in Indian vehicle parking areas. Engine oil, gear oil, and brake fluid all contain heavy hydrocarbons that penetrate tile surfaces and grout joints at different speeds depending on tile porosity. On GVT and Full Body vitrified tiles with near-zero water absorption, the oil sits on the surface for longer before penetrating. On Kota stone and unglazed porcelain, absorption happens within minutes.
The most important variable in oil stain removal is time. An oil stain treated within an hour of occurring can often be removed completely. The same stain left for a week becomes significantly harder. Left for a month on a porous surface, it may be permanent.
Fresh Oil Stains (Under 24 Hours): Step by Step
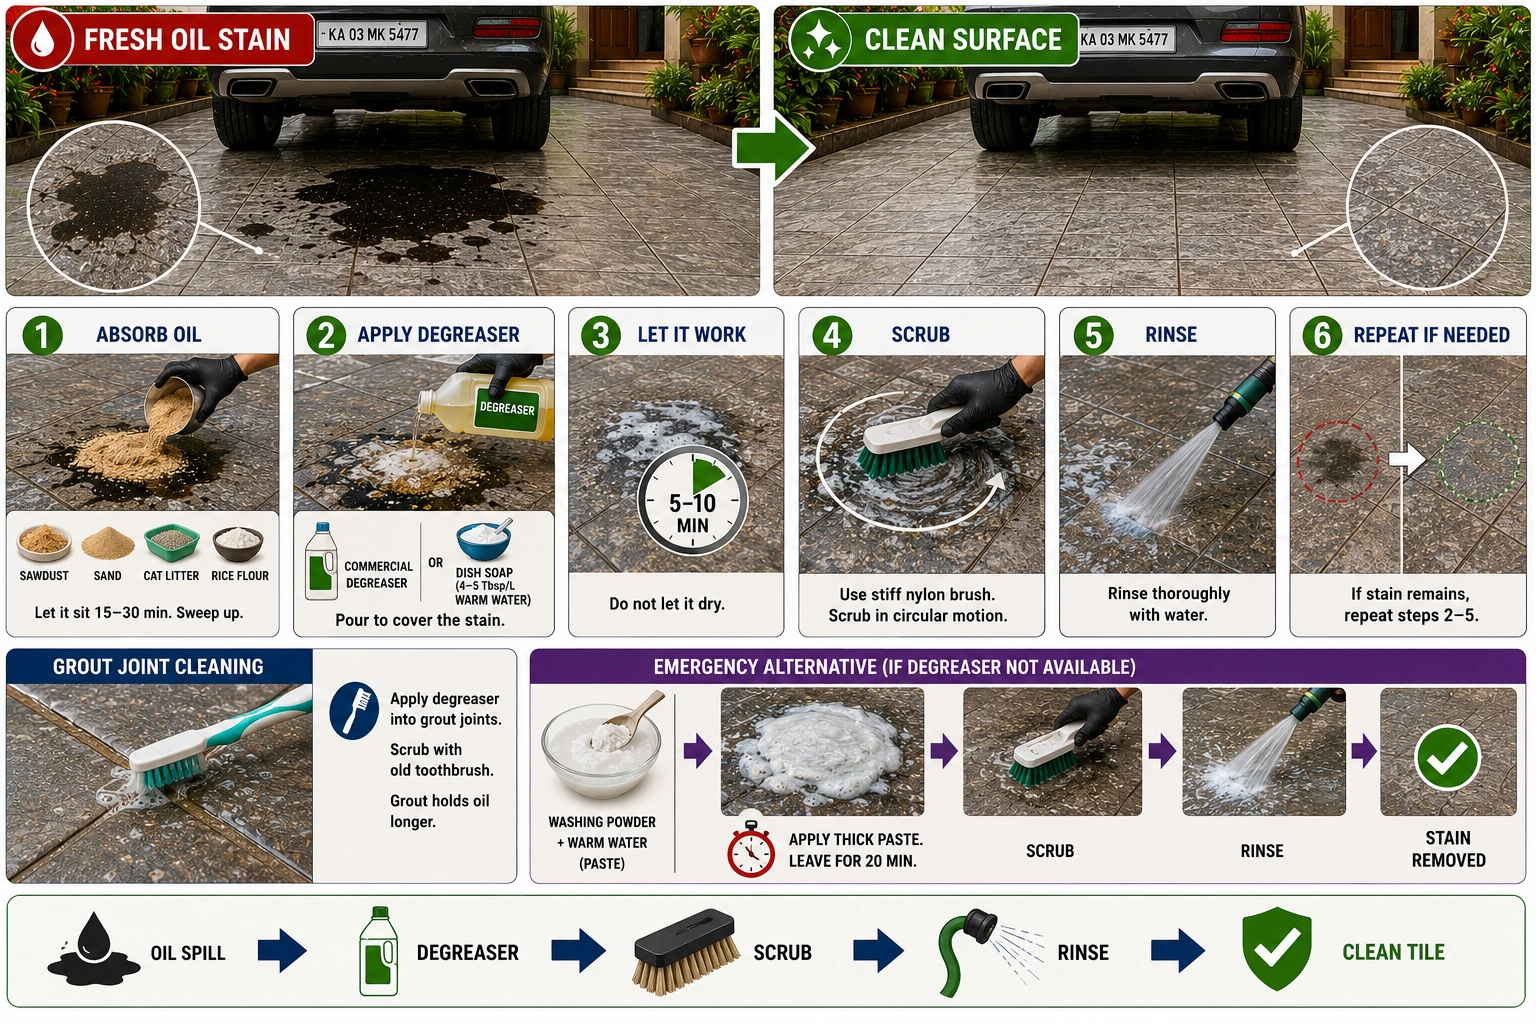
- Absorb the excess immediately. Pour a generous layer of dry material over the wet oil. Sawdust, coarse sand, dry soil, cat litter, or rice flour all work. Let it sit for 15 to 30 minutes to absorb the free oil. Do not rub or spread the oil further. Sweep up the absorbed material.
- Apply alkaline degreaser directly onto the stained area. A commercial outdoor tile degreaser or a concentrated dish soap solution (4 to 5 tablespoons per litre of warm water) both work for fresh stains. Pour enough to cover the stain with a thin layer.
- Leave the degreaser to sit for 5 to 10 minutes. Do not let it dry on the surface. If the weather is hot (above 35 degrees Celsius), work in smaller sections and add water to prevent the cleaner from drying.
- Scrub firmly with a stiff nylon-bristle brush in circular motions. Work from the outer edge of the stain inward to prevent spreading.
- Rinse thoroughly with a garden hose. Check the stain. If residue remains, repeat the degreaser application and scrub a second time before the tile dries.
- For grout joints that have absorbed oil, apply the degreaser directly into the joint with an old toothbrush and scrub. Grout is more porous than the tile body and holds oil longer.
Pro Tip: If commercial degreaser is not available, a paste of washing powder (laundry detergent) and warm water is a strong second option for fresh oil stains. Apply the paste thickly over the stain, leave for 20 minutes, scrub, and rinse. This works well on vitrified tiles in an emergency.
Old or Set Oil Stains (Over 24 Hours): Step by Step
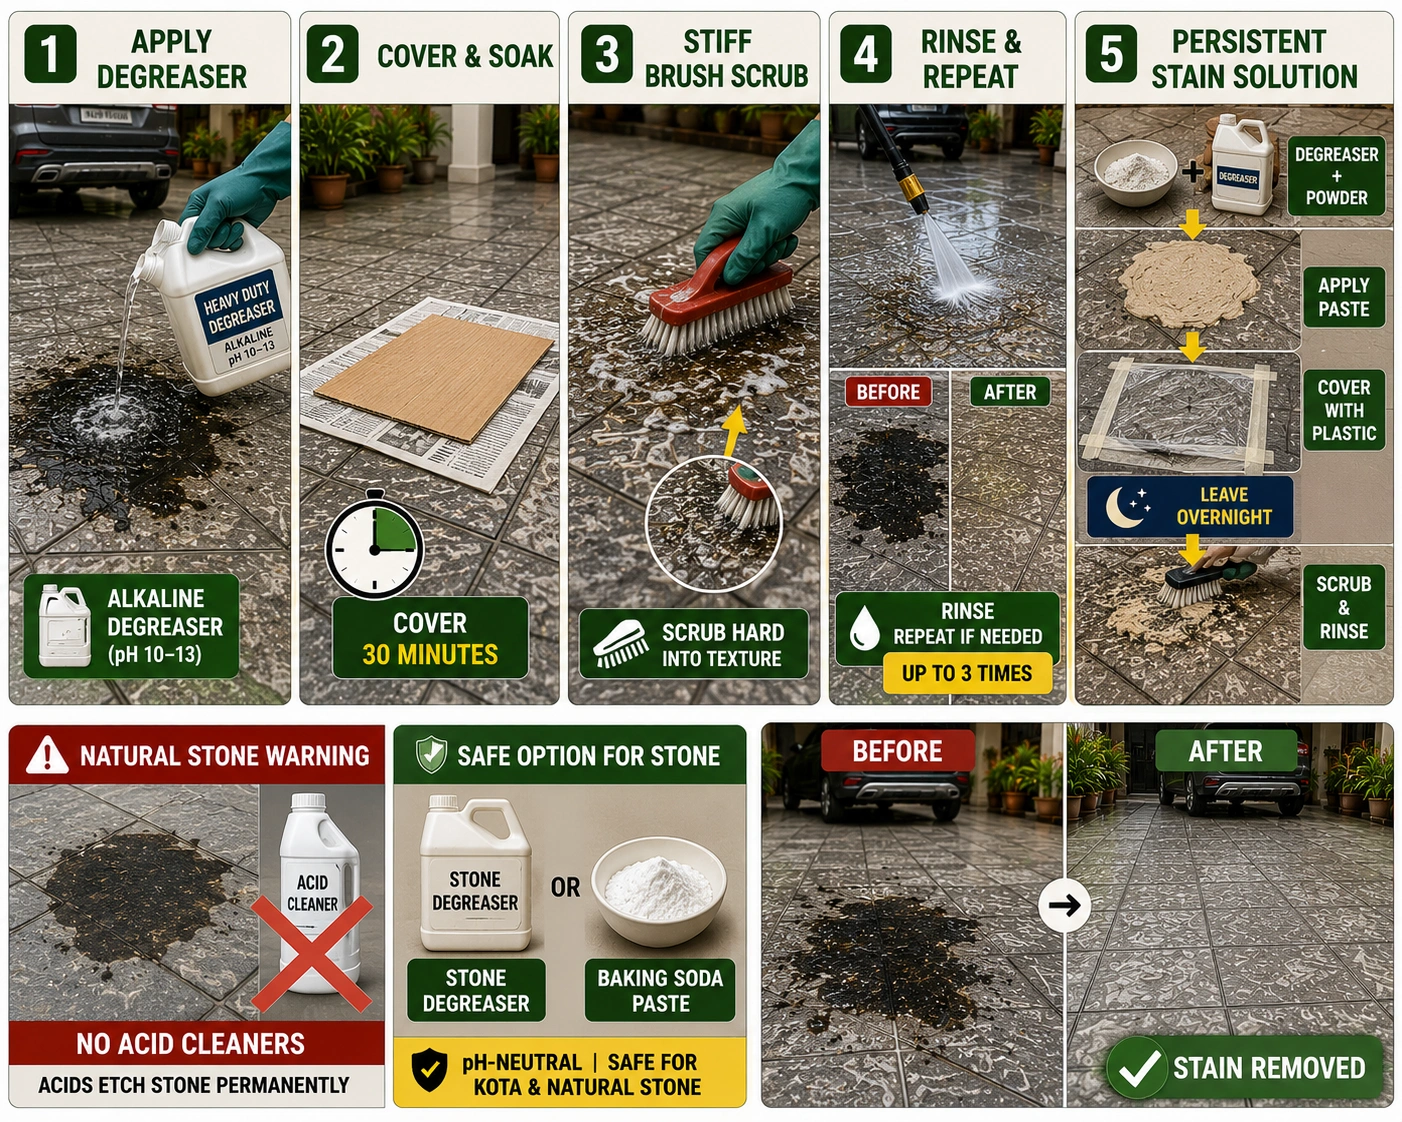
Set oil stains require a stronger approach because the hydrocarbon compounds have partly cured into the surface. Standard dish soap will not break the bond at this stage.
- Apply a concentrated commercial alkaline degreaser (pH 10 to 13) directly to the stain. Products labelled 'concrete degreaser', 'workshop floor cleaner', or 'heavy-duty outdoor tile cleaner' are suitable. Follow the product dilution instructions.
- Cover the degreaser with a piece of old cloth, newspaper, or cardboard to slow evaporation. Leave for 30 minutes to allow penetration into the set stain.
- Scrub hard with a stiff nylon brush. If the stain is on a textured GHR or rain-drop surface, use the brush to work the degreaser into the texture peaks and valleys.
- Rinse and assess. For a stain over one week old, a single treatment may not fully remove it. Repeat the soak-and-scrub cycle up to three times.
- For persistent set stains on vitrified tiles, a poultice method works well. Mix the degreaser with an absorbent powder (powdered chalk or talcum powder) to a thick paste, apply it over the stain, cover with plastic film, tape the edges, and leave overnight. The paste draws the oil upward as it dries. Scrub and rinse the next morning.
Important: For old oil stains on Kota stone or natural stone, do not use acidic cleaners. Use a pH-neutral stone degreaser or a baking soda paste applied as a poultice. Acids etch stone surfaces permanently, and a white ring around the cleaned area is common when the wrong product is used on stone.
Diesel Spill Stains: Why They Need Separate Treatment
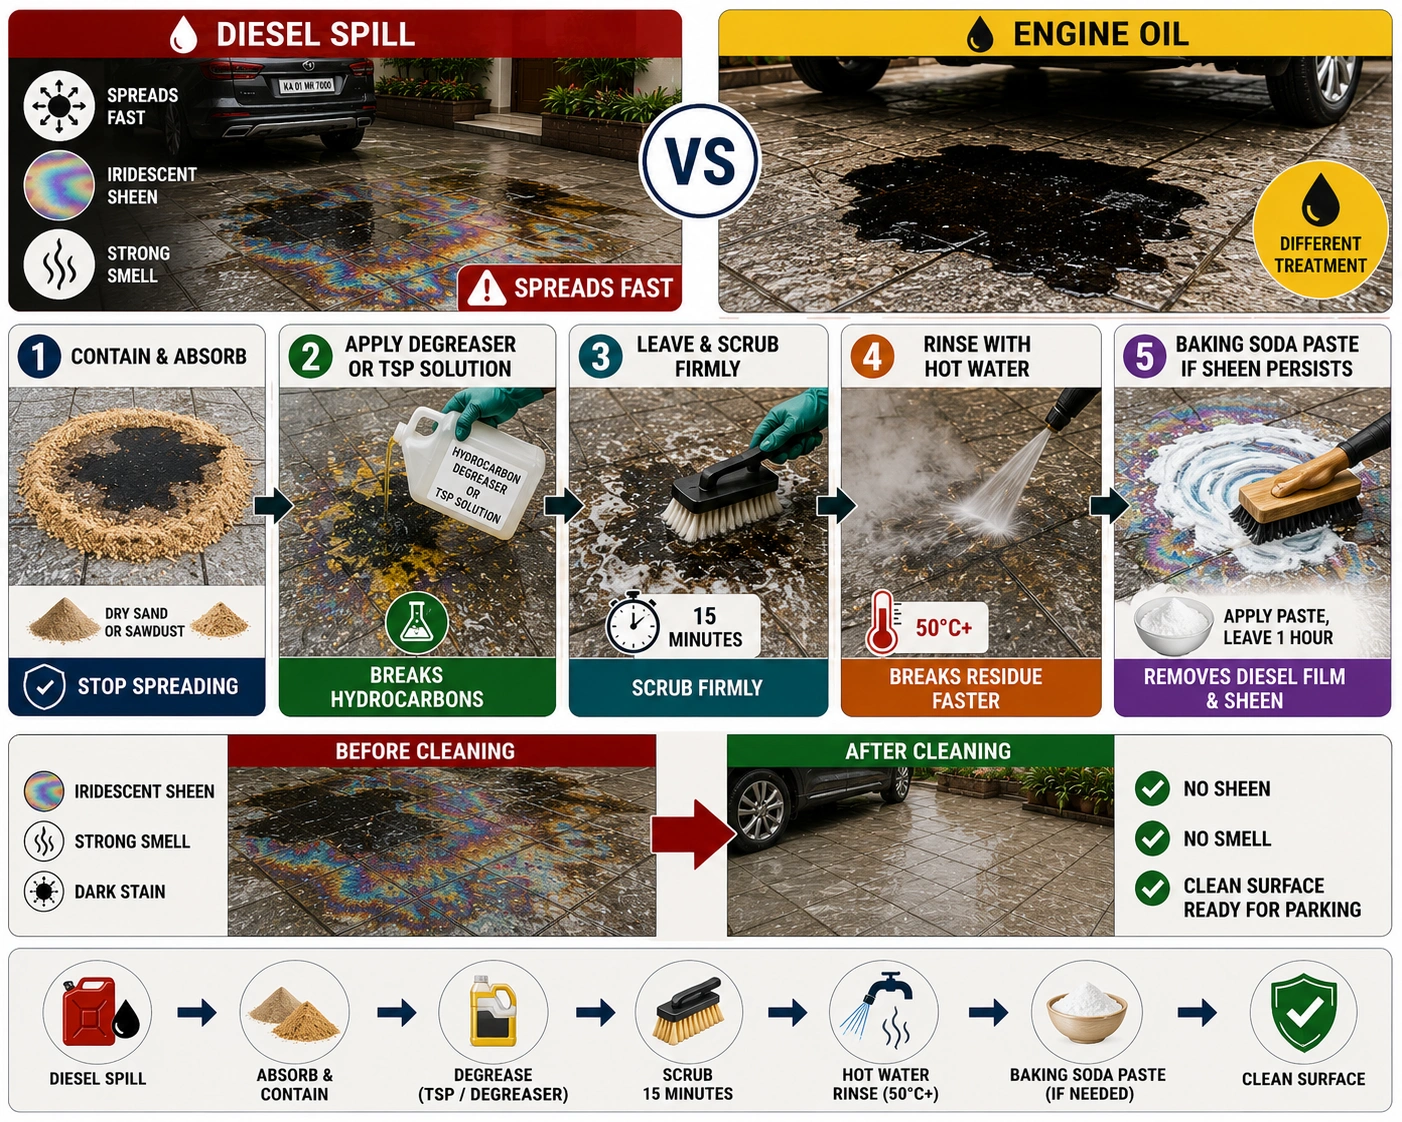
Diesel stains are chemically different from engine oil and need a slightly different approach. Diesel is a lighter hydrocarbon fraction and spreads over a larger area quickly. It also leaves a persistent smell and an iridescent sheen on the tile surface that simple degreasing does not always fully remove.
- Contain the spill first. Pour dry sand or sawdust around the edges to stop spreading. The n absorb the centre with the same material.
- Apply a commercial hydrocarbon degreaser or a strong solution of TSP (trisodium phosphate, available at hardware shops) at the label-recommended dilution.
- Leave for 15 minutes, scrub firmly, and rinse with hot water where possible. Hot water above 50 degrees Celsius breaks the residual hydrocarbon bond faster than cold water.
- If iridescent sheen persists after two cleaning cycles, apply a thick paste of baking soda over the area, leave for an hour, scrub, and rinse. Baking soda is alkaline and breaks residual diesel film effectively on vitrified tile surfaces.
- Air the area for 24 hours before parking a vehicle. The smell dissipates as the remaining light hydrocarbons evaporate.
How to Remove Tyre Marks from Parking Tiles
Tyre marks on parking tiles are rubber transfer stains. When a vehicle tyre is warm from driving and brakes or turns sharply, soft rubber molecules transfer from the tyre surface to the tile and bond to the glaze or stone surface through a combination of heat and pressure. The result is a dark grey to black smear that resists water and standard mopping.
The approach differs between light scuff marks, which are surface deposits, and heavy black burns from emergency braking, which involve deeper rubber fusion into the tile surface.
Light Tyre Scuff Marks
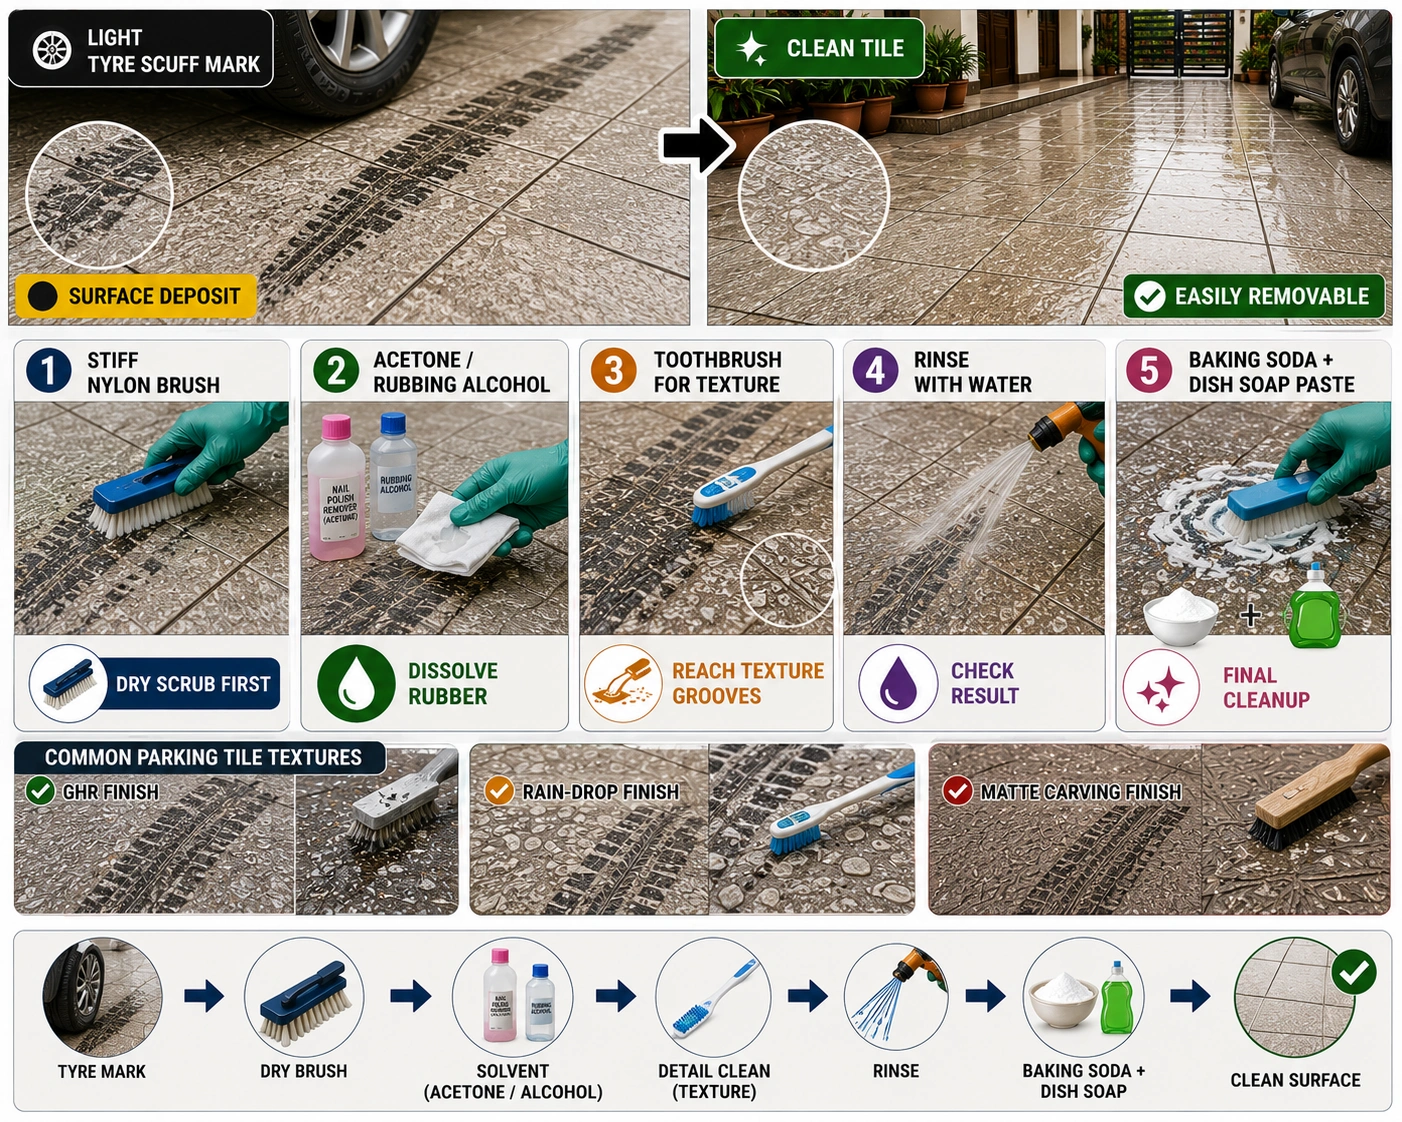
Light marks are surface deposits where the rubber has not fully fused with the tile. These respond to mechanical cleaning without chemical treatment in most cases.
- Dry scrub first with a stiff nylon brush before adding any water. Dry rubber often lifts more easily than wet rubber. Scrub firmly in the direction of the tyre mark.
- If dry scrubbing does not clear the mark, apply a small amount of nail polish remover (acetone) or rubbing alcohol onto a cloth and rub the mark in a circular motion. These solvents dissolve surface rubber compounds without damaging vitrified or porcelain tile glaze.
- Rinse the area with water after solvent use and check. For GHR or rain-drop finish, use a toothbrush with the solvent to reach into the texture.
- If the mark persists, apply a paste of baking soda and a few drops of dish soap, scrub firmly, and rinse.
Pro Tip: Acetone (nail polish remover) is the fastest and most effective solvent for light tyre scuff marks on vitrified tiles. Apply it on a cloth rather than directly on the tile to control the quantity. Work quickly because acetone evaporates fast.
Heavy Black Tyre Burns from Emergency Braking or Sharp Turns
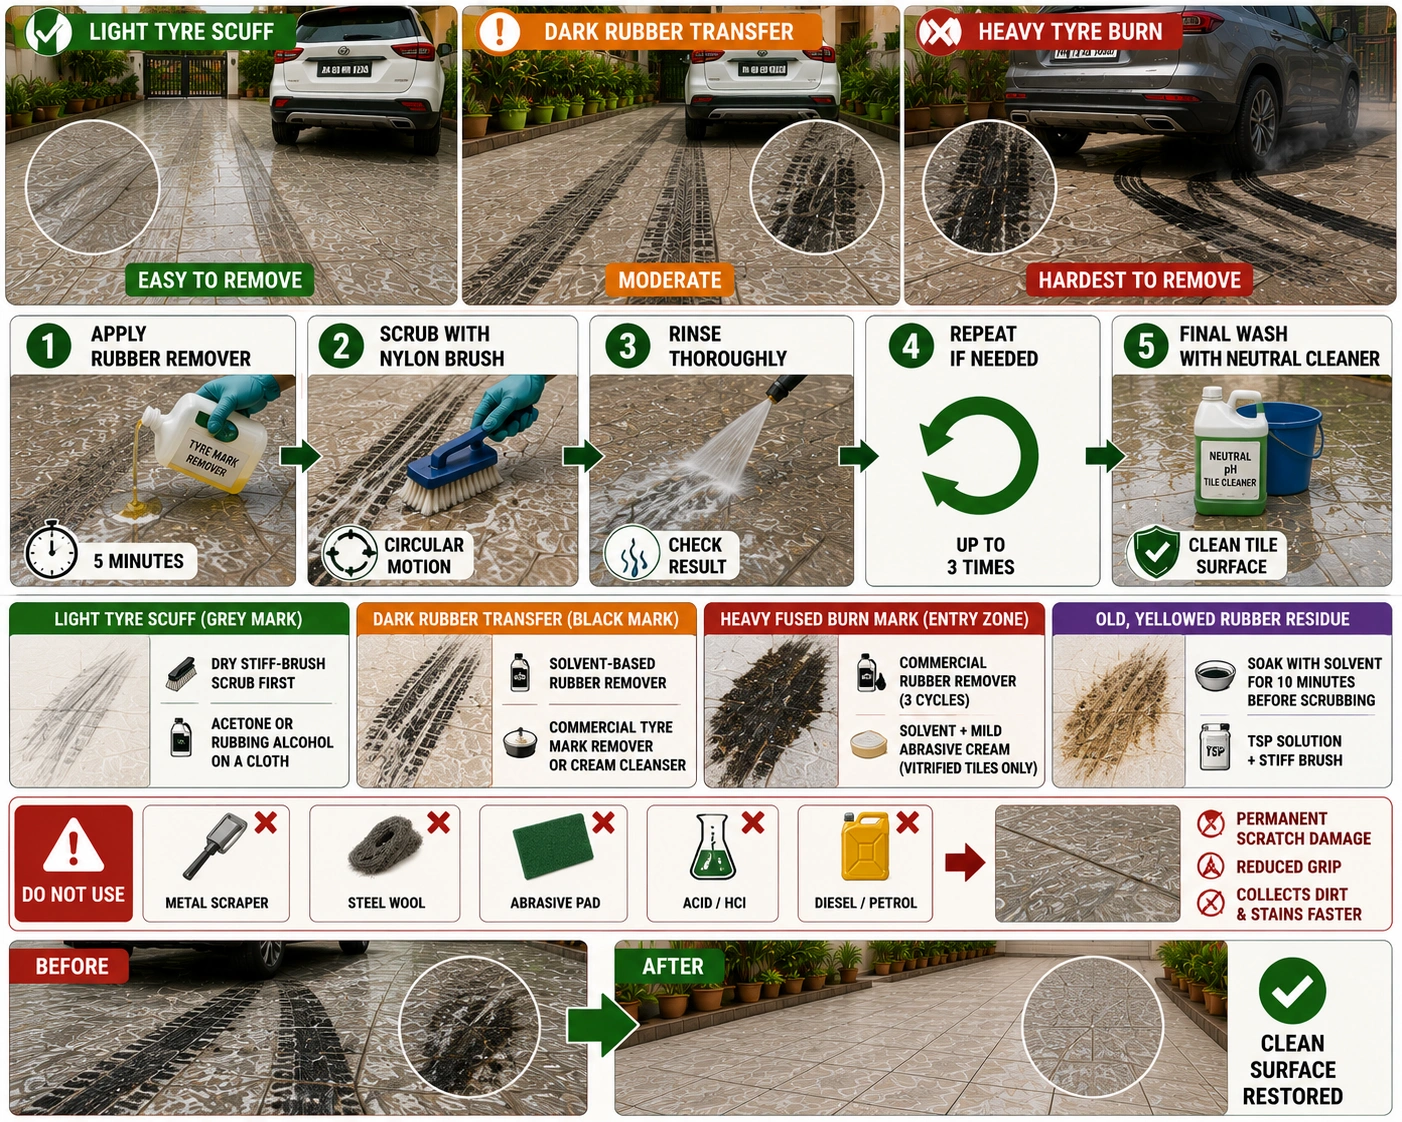
Heavy tyre burns involve rubber that has been heated to a high temperature and fused into the tile surface under vehicle weight. These require a stronger chemical approach.
- Apply a commercial rubber remover or a solvent-based cleaner (look for products labelled 'tyre mark remover' or 'rubber stain remover' at automotive supply shops). Apply to the mark and leave for 5 minutes.
- Scrub with a stiff nylon brush. For textured tiles, use a firm circular motion to work the cleaner into the texture pattern.
- Rinse and assess. Repeat up to three times for heavy marks.
- For marks that resist solvent cleaning on vitrified tiles, a careful application of a cream cleanser (mildly abrasive household product like Vim cream) on a cloth, rubbed in circular motion, can lift the fused rubber layer. Use sparingly on matte and GHR finish tiles and do not use on polished or high-gloss surfaces where any abrasive causes visible scratching.
- Rinse thoroughly after all cleaning. Apply a neutral pH tile cleaner as a final wash to remove any solvent residue from the tile surface.
Caution: Do not use metal scrapers, steel wool, or abrasive pads to remove tyre marks. These scratch tilglazesze permanently, creating micro-grooves that collect future stains faster and reduce the tile's grip performance. The scratch damage is visible in direct sunlight and cannot be repaired on vitrified tiles.
| Mark Type | First Step | Chemical Option | Avoid |
|---|---|---|---|
| Light tyre scuff (grey mark) | Dry stiff-brush scrub first | Acetone or rubbing alcohol on a cloth | Metal scrapers, steel wool |
| Dark rubber transfer (black mark) | Solvent-based rubber remover | Commercial tyre mark remover or cream cleanser | Acids, bleach (ineffective on rubber) |
| Heavy fused burn mark (entry zone) | Commercial rubber remover (3 cycles) | Solvent plus mild abrasive cream cleanser on vitrified only | Abrasive pads, HCl, diesel |
| Old, yellowed rubber residue | Soak with solvent for 10 minutes before scrubbing | TSP solution plus stiff brush | Bleach (will not lift rubber compounds) |
How to Remove Algae, Moss and Biofilm from Parking Tiles
Algae on parking tiles is not just a visual problem. A thin algae film reduces the tile's grip coefficient to near-zero when wet, creating a genuine slip risk. After the Indian monsoon, most open parking surfaces in coastal and high-humidity zones develop some degree of algae or biofilm within four to six weeks of the monsoon onset.
The impact of algae varies significantly by surface finish. This Parking Tile Texture and Grip Guide explains which parking tile textures maintain better traction during Indian monsoons and why finish selection matters for long-term safety.
Surface algae appears as a green or grey-green film that is slimy when touched. Moss develops in grout joints as a fuzzy, thicker growth. Biofilm is the early stage of algae growth, appearing as a dark, slightly slippery discolouration that many homeowners mistake for a stain. All three need the same treatment sequence: kill, scrub, flush, and prevent.
Surface Algae After Monsoon
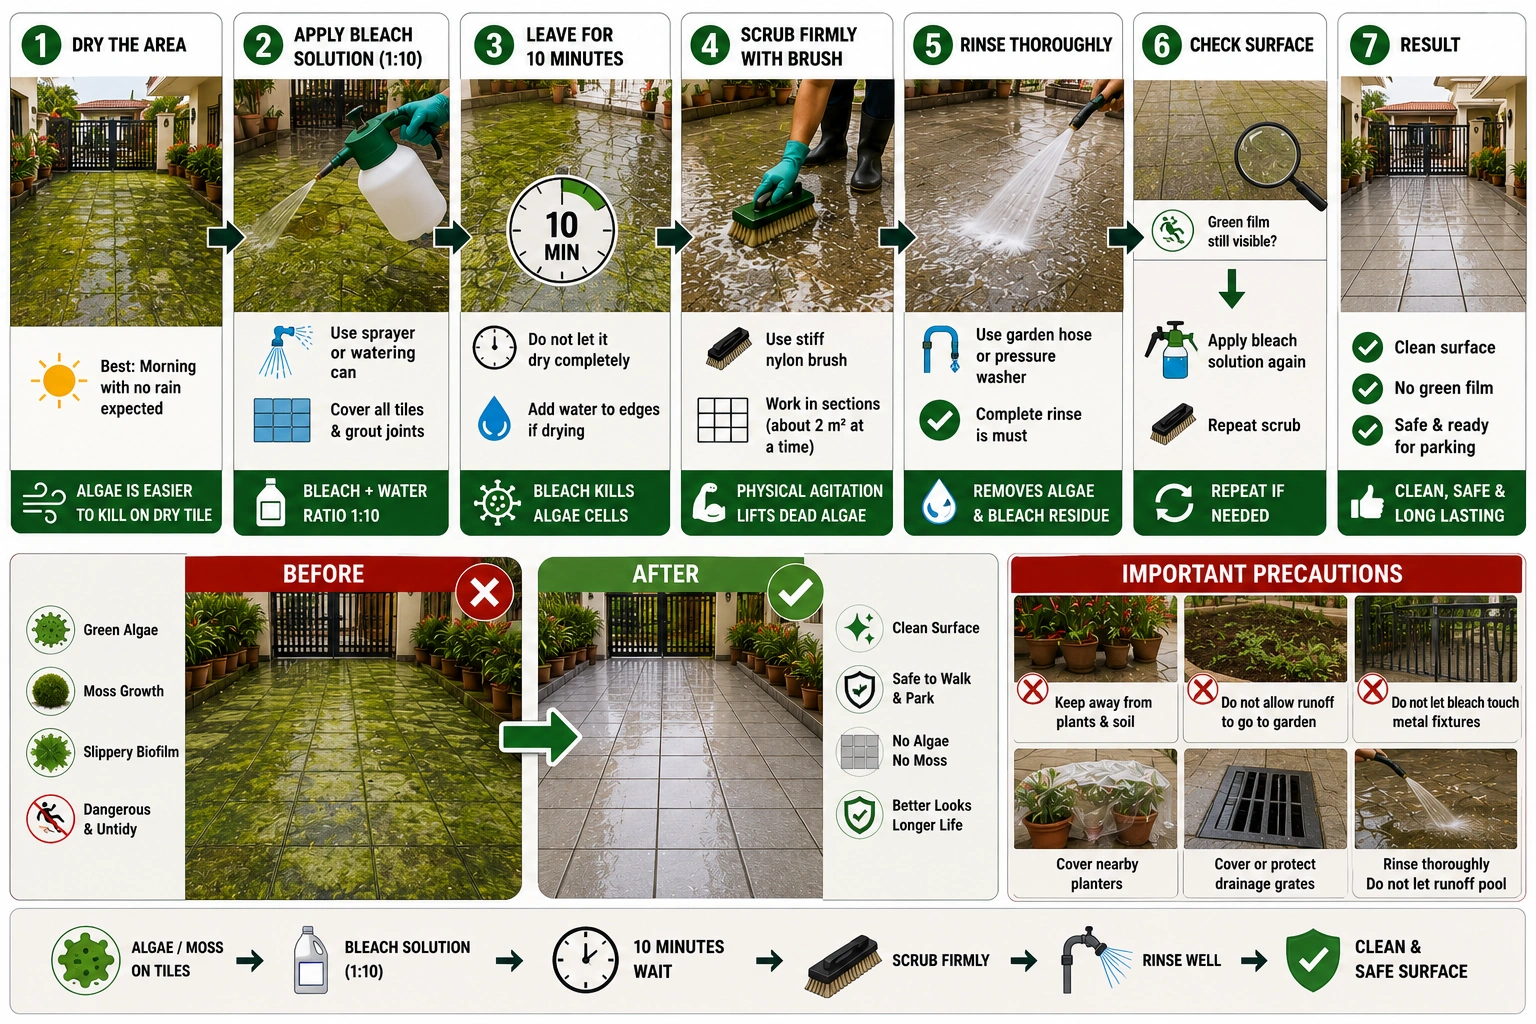
- Dry the area first, wherever possible. Algae is easier to kill on a tile surface that is not actively wet. Wait for a break in the rain if treating during monsoon, or treat on a morning when rain is not expected.
- Apply a diluted sodium hypochlorite solution (bleach diluted 1:10 with water) across the entire algae-affected area using a watering can or garden sprayer. Cover every tile face and grout joint. Do not scrub yet.
- Leave the solution on the surface for 10 minutes. The bleach kills the algae cells. Do not let it dry completely; add a little water to the edges if it starts drying before the 10 minutes are up.
- Scrub firmly with a stiff nylon brush. The dead algae cells lift off the tile surface with physical agitation. Work in sections of about 2 square metres at a time to keep the treatment fresh.
- Rinse thoroughly with a garden hose or pressure washer. The rinse must be complete because bleach residue left on grout darkens and can cause a colour change in cement grout over multiple applications.
- Check the tile surface for remaining film. If green discolouration persists, apply the bleach solution a second time and repeat the scrub.
Important: Bleach solution must not contact plants, garden soil, or metal fixtures. Cover nearby planters and drainage grates before applying. Rinse completely and do not allow the runoff to pool near plant roots.
Deep-Set Moss in Grout Joints
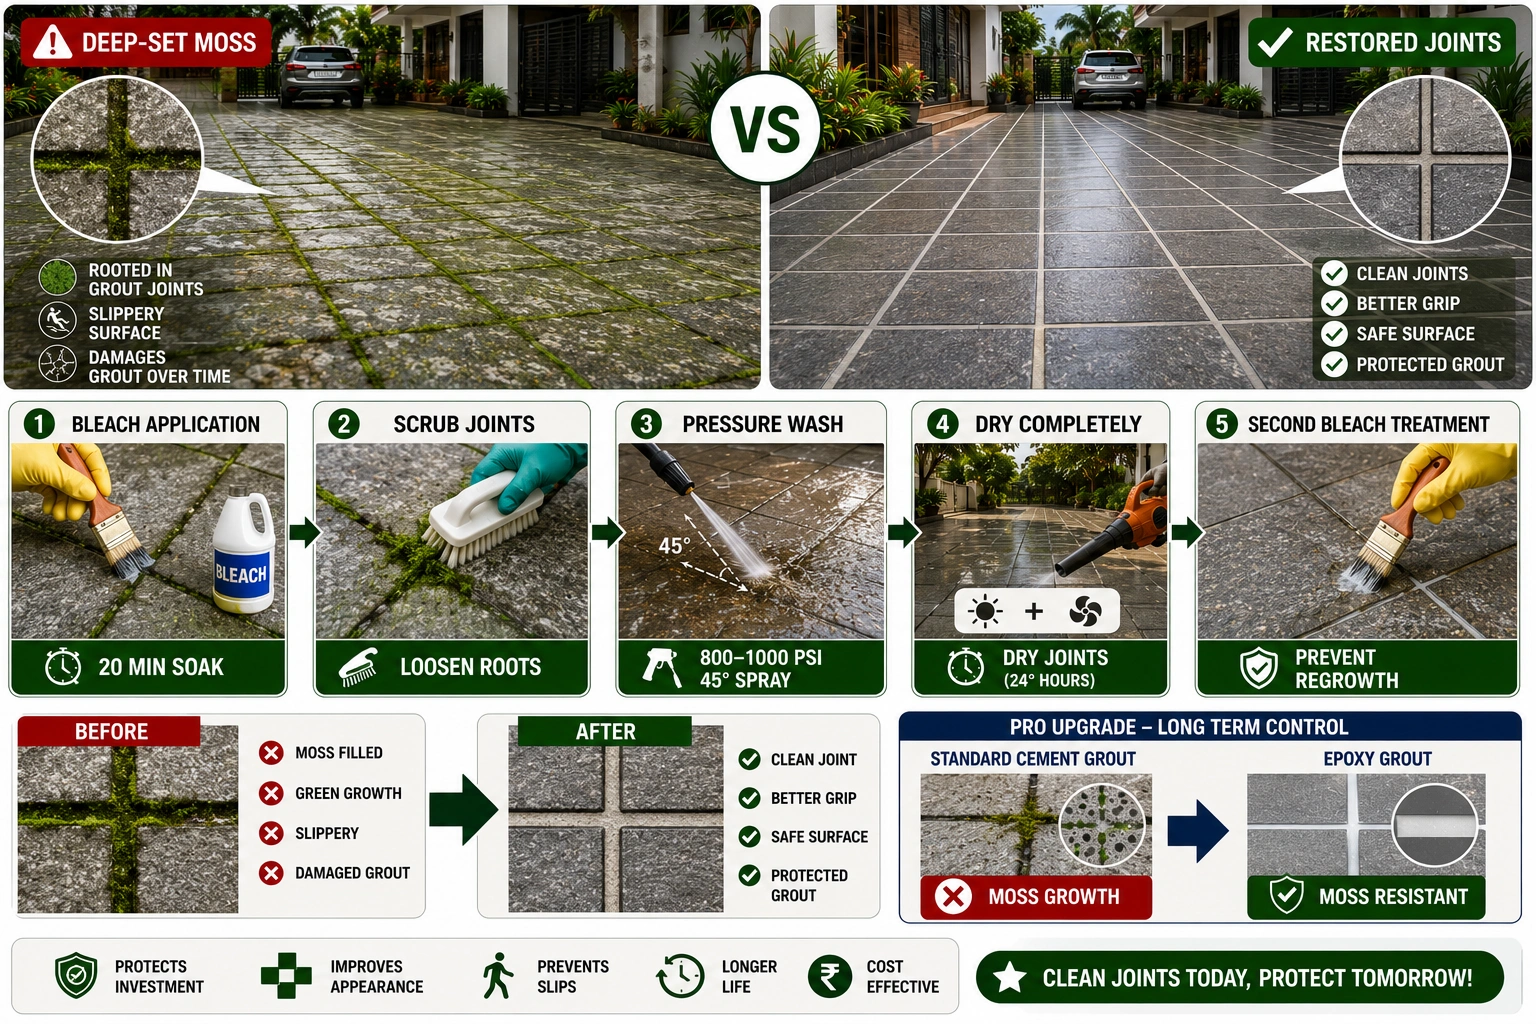
Moss in grout joints is physically rooted in the cement matrix. Bleach treatment alone does not remove established moss because the physical structure remains after the organism is killed. This needs both chemical treatment and physical extraction.
- Apply concentrated bleach (undiluted or 1:5 dilution for established moss) directly into the grout joints using an old paintbrush or syringe. Let it soak for 20 minutes.
- Use a stiff wire brush (nylon, not metal) or an old toothbrush to scrub directly into the grout joint. The softened moss loosens and can be worked out of the joint.
- Flush the joint with water at pressure. A pressure washer at 800 to 1,000 PSI directed at 45 degrees into the joint clears debris effectively without dislodging the grout itself.
- Dry the joints fully by allowing 24 hours of dry weather or using a leaf blower to remove moisture. Re-applying bleach to dry, empty joints prevents immediate re-growth.
- For joints where moss has established deeply (more than 3 mm into the joint), consider re-grouting the affected sections after cleaning. Moss can break down cement grout over time if left untreated across multiple monsoon seasons.
Pro Tip: The most effective long-term control for moss in grout joints is switching to epoxy grout during the next maintenance cycle. Moss cannot establish in epoxy grout because the surface is non-porous and does not provide the organic substrate that moss needs. This upgrade is most practical when a section of tiles needs to be relaid anyway.
Using a Pressure Washer Safely on Parking Tiles
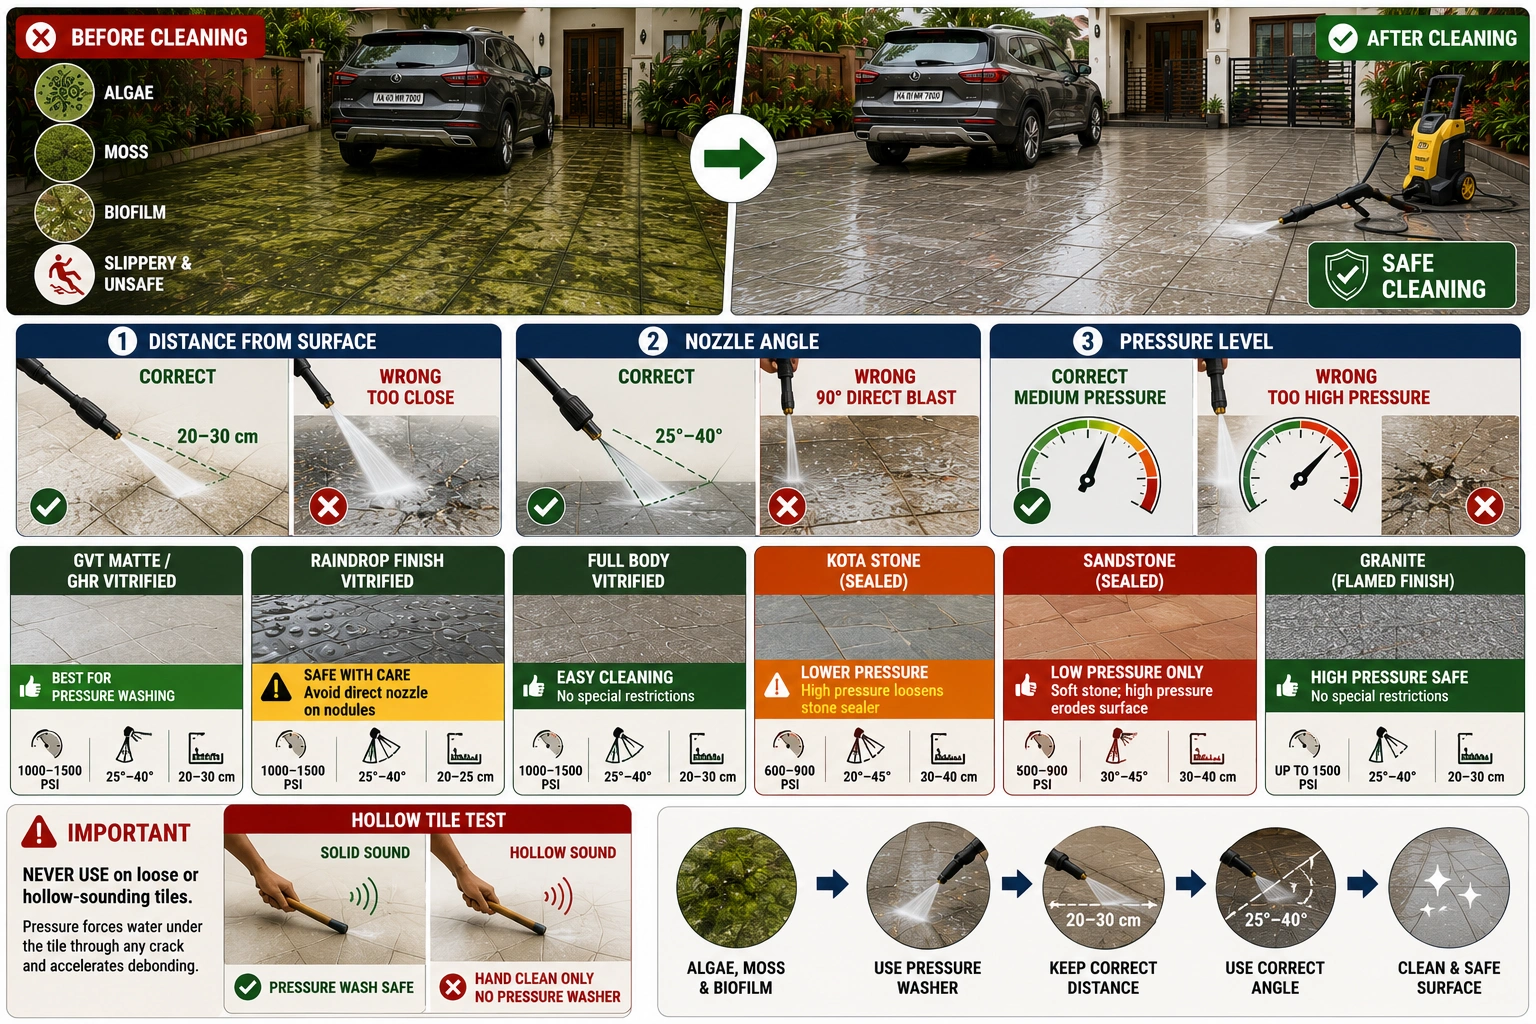
A pressure washer is the most time-efficient tool for post-monsoon parking tile cleaning, but incorrect use damages tiles and grout. The key variables are pressure setting, nozzle angle, and distance from the tile surface.
| Tile Type | Safe Pressure Range | Nozzle Angle | Distance from Surface | What to Avoid |
|---|---|---|---|---|
| GVT matte, GHR vitrified | 1,000 to 1,500 PSI | 25 to 40 degrees | 20 to 30 cm | Direct right-angle blasting into grout joints |
| Raindrop finish vitrified | 1,000 to 1,500 PSI | 25 to 40 degrees | 20 to 25 cm | Avoid concentrating the jet on a single nodule at close range |
| Full Body vitrified | 1,000 to 1,500 PSI | 25 to 40 degrees | 20 to 30 cm | No special restrictions |
| Kota stone (sealed) | 600 to 900 PSI | 30 to 45 degrees | 30 to 40 cm | High pressure loosens stone sealer; reduce pressure compared to vitrified |
| Sandstone (sealed) | 500 to 800 PSI | 30 to 45 degrees | 30 to 40 cm | Soft stone; high pressure erodes the surface; stay at low pressure |
| Granite (flamed finish) | Up to 1,500 PSI | 25 to 40 degrees | 20 to 30 cm | No special restrictions for flame-treated natural granite |
Important: Never use a pressure washer on loose or hollow-sounding tiles. The pressure forces water under the tile through any crack and accelerates debonding. Tap each tile in the cleaning area before starting. If any tile sounds hollow, clean that area by hand only and arrange for re-laying before the next monsoon.
How to Remove Hard Water Stains and Calcium Deposits from Parking Tiles
Hard water stains are a problem specific to large parts of India that most tile cleaning blogs ignore. Cities including Delhi, Jaipur, Agra, Lucknow, Ahmedabad, Vadodara, Nagpur, and Chandigarh have municipal water with total dissolved solids (TDS) above 300 mg per litre and often above 500 mg per litre. When this water evaporates on a tile surface, it leaves white calcium carbonate and magnesium carbonate deposits behind. These deposits build up over months into a white crust that standard cleaning cannot remove.
The same mineral deposits accumulate from overhead tank overflow, garden irrigation water hitting paved areas, and water from AC condensate units dripping onto parking tiles below.
Light Hard Water Film (Thin White Haze)
- Mix white vinegar with water in a 1:1 ratio. Pour or spray onto the affected area.
- Leave for 5 minutes. The mild acetic acid in vinegar dissolves light calcium carbonate deposits.
- Scrub with a stiff nylon brush and rinse thoroughly.
- For stains that persist, increase the vinegar concentration to 2:1 (two parts vinegar, one part water) and leave for up to 10 minutes before scrubbing.
Caution: Use vinegar only on vitrified tiles (GVT, Full Body, Colour Body) and porcelain. Never use vinegar on Kota stone, marble, sandstone, or any calcium-based natural stone. The acid in vinegar dissolves calcium carbonate, which is the primary mineral in these stones. Even a single 5-minute application will visibly etch the stone surface.
Heavy Calcium Scale Deposits (White Crust, Multiple Layers)
- For deposits that vinegar does not shift, use a commercial lime and scale remover (available at plumbing supply shops and hardware stores). These are stronger acidic solutions formulated for mineral scale. Apply per the product instructions.
- Do not leave strong acid cleaners on tiles for more than 3 minutes. Rinse with large volumes of water immediately after the contact time.
- For a very heavy crust, a plastic scraper used gently can help lift the loosened scale after the acid treatment. Never use metal scrapers.
- After removing scale, apply a neutral pH tile cleaner to neutralise any residual acidity on the surface, then rinse again.
Pro Tip: In cities with high TDS water, preventing hard water stains is more practical than repeatedly removing them. Parking tiles near the water meter, overhead tank base, or garden tap area accumulate scale fastest. Wiping these areas dry weekly or redirecting water flow away from tile surfaces reduces build-up significantly between cleaning sessions.
| Hard Water Deposit Type | Appearance | Treatment | Safe On |
|---|---|---|---|
| Light calcium film (recent) | Thin white haze, slightly rough to the touch | Vinegar solution 1:1, 5 minutes, scrub and rinse | Vitrified tiles and porcelain only |
| Medium calcium build-up (months old) | White spots with texture, resist normal cleaning | Vinegar 2:1 or dilute commercial lime remover | Vitrified tiles and porcelain only |
| Heavy calcium crust (years of build-up) | White ridge or deposit, visible from standing height | Commercial lime scale remover plus plastic scraper | Vitrified tiles only; professional cleaning for stone |
| Reddish-brown mineral stain (iron in water) | Orange to brown patches near the water outlet or drain | Oxalic acid solution (5 to 10%), 5 minutes max, rinse | Vitrified tiles and porcelain only |
Cleaning by Tile Finish Type: What Changes and What Stays the Same
The cleaning chemistry described above applies across most tile types. What changes by finish is the physical scrubbing method, the pressure washer settings, and the acid tolerance of the surface.
Cleaning GHR and Matte Vitrified Parking Tiles
GHR and matte GVT tiles are the most forgiving outdoor tiles to clean. Their surfaces handle stiff nylon brushes, alkaline degreasers, dilute bleach, and moderate pressure washing without damage. The stone-like surface texture of GHR responds well to scrubbing because the texture helps dislodge embedded material with physical agitation.
For routine cleaning, a monthly sweep and quarterly scrub with a neutral pH cleaner keep GHR tiles in good condition year-round. After the onsoon, the full treatment sequence (algae kill, scrub, flush, grout treatment) brings GHR tiles back to near-new condition reliably.
What to avoid on GHR and matte vitrified: Abrasive cleaning powders applied dry. Dry abrasive on any vitrified tile surface creates micro-scratches that are not visible immediately but reduce the clarity of the surface finish over multiple cleaning cycles.
Cleaning Rain-Drop Finish Parking Tiles
Raindrop tiles need more physical attention during cleaning because their nodule valleys trap silt, algae, and debris. The cleaning chemistry is the same as for GHR, but each cleaning session needs a dedicated toothbrush or a narrow, stiff brush to address the valleys between nodules.
A pressure washer angled at 25 to 30 degrees across the tile face, rather than directly at the nodule tops, is more effective at clearing the valleys than straight-on blasting. Move the wand across the tile in overlapping passes rather than concentrating the jet on one area.
What to avoid on rain-drop tiles: Leaving the cleaning solution to dry in the nodule valleys. Always rinse thoroughly and completely. Dried bleach in the valleys causes uneven discolouration in cement grout over multiple applications.
Cleaning Kota Stone and Natural Stone Parking Tiles
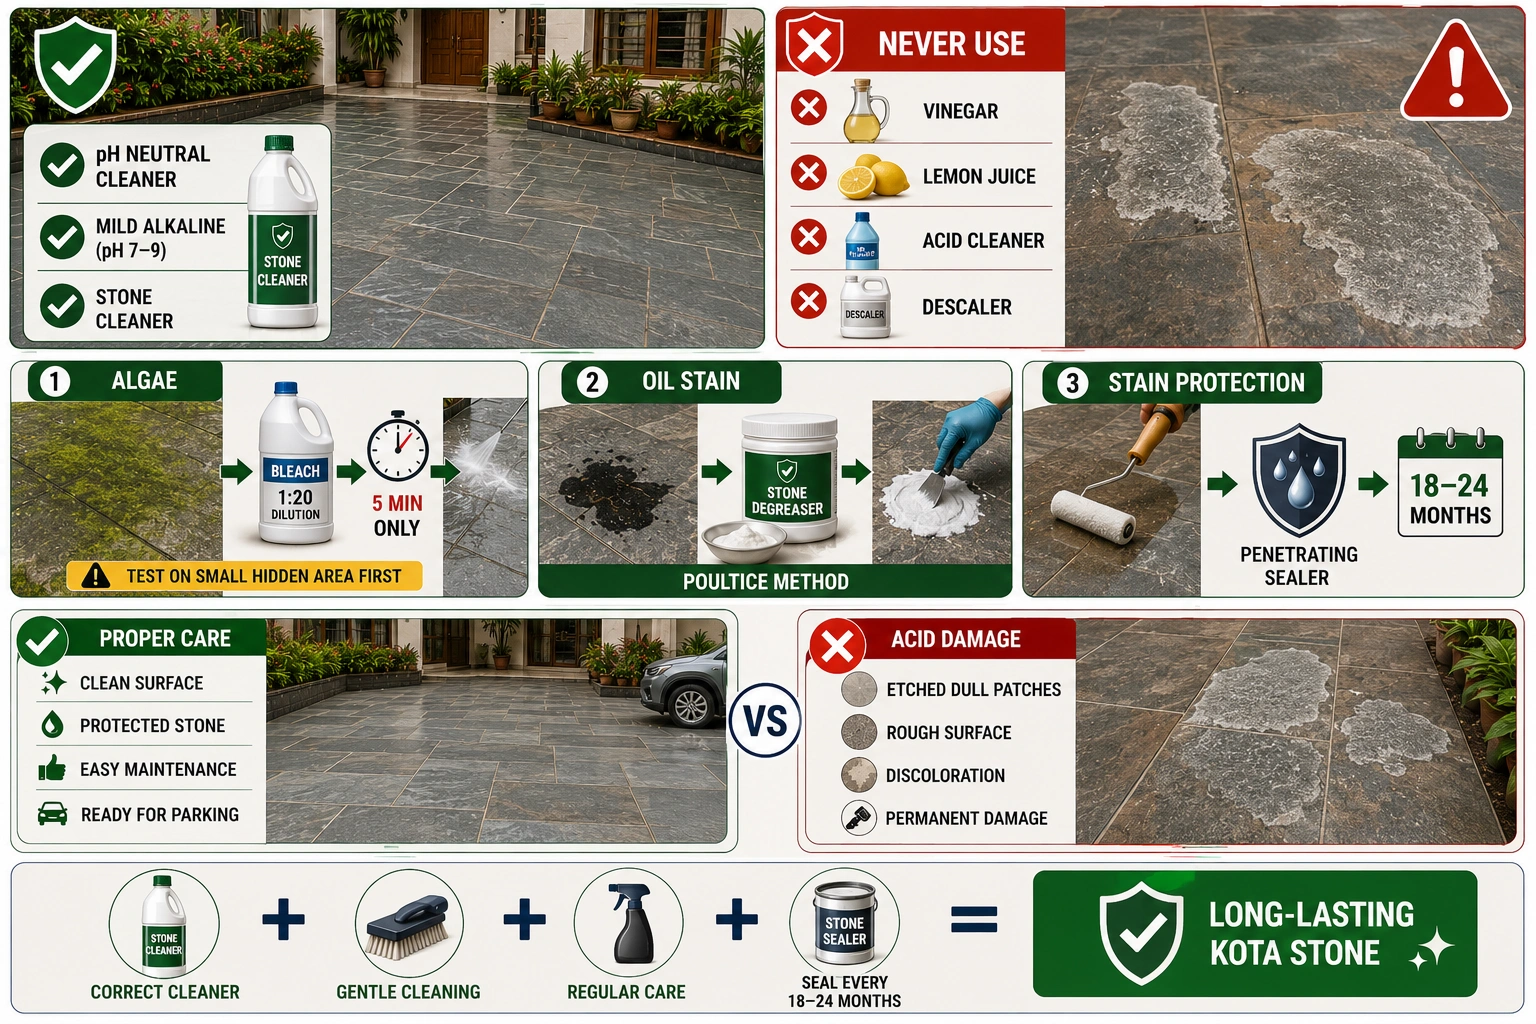
Natural stone needs a fundamentally different chemical approach from vitrified tiles. The key rule is pH neutrality. Kota stone, sandstone, and most Indian natural stones are calcium carbonate-based. Acids etch them. Even weak acids like vinegar cause permanent surface damage to natural stone. Bleach at high concentration also causes surface discolouration on some stone types.
- Use only pH-neutral stone cleaners or mild alkaline stone cleaners (pH 7 to 9 maximum) for all routine and deep cleaning of natural stone parking surfaces.
- For algae on Kota stone, use a dilute bleach solution (1:20 dilution, not the 1:10 used on vitrified tiles), leave for 5 minutes only, and rinse completely. Test on a small hidden area first.
- For oil stains on Kota stone, use the poultice method with a pH-neutral stone degreaser. Do not use alkaline degreasers with a pH above 10 on Kota stone without checking the manufacturer's guidance.
- Re-seal Kota stone every 18 to 24 months using a penetrating stone sealer. A properly sealed Kota stone surface resists oil and stain penetration far better and cleans significantly more easily than unsealed stone.
Caution: Vinegar, lemon juice, diluted hydrochloric acid, and any descaling product containing phosphoric or sulfamic acid will permanently etch Kota stone and sandstone. The etch shows as a dull patch or rough area and cannot be reversed without professional stone grinding and polishing.
The Indian Parking Tile Cleaning Calendar: Season by Season
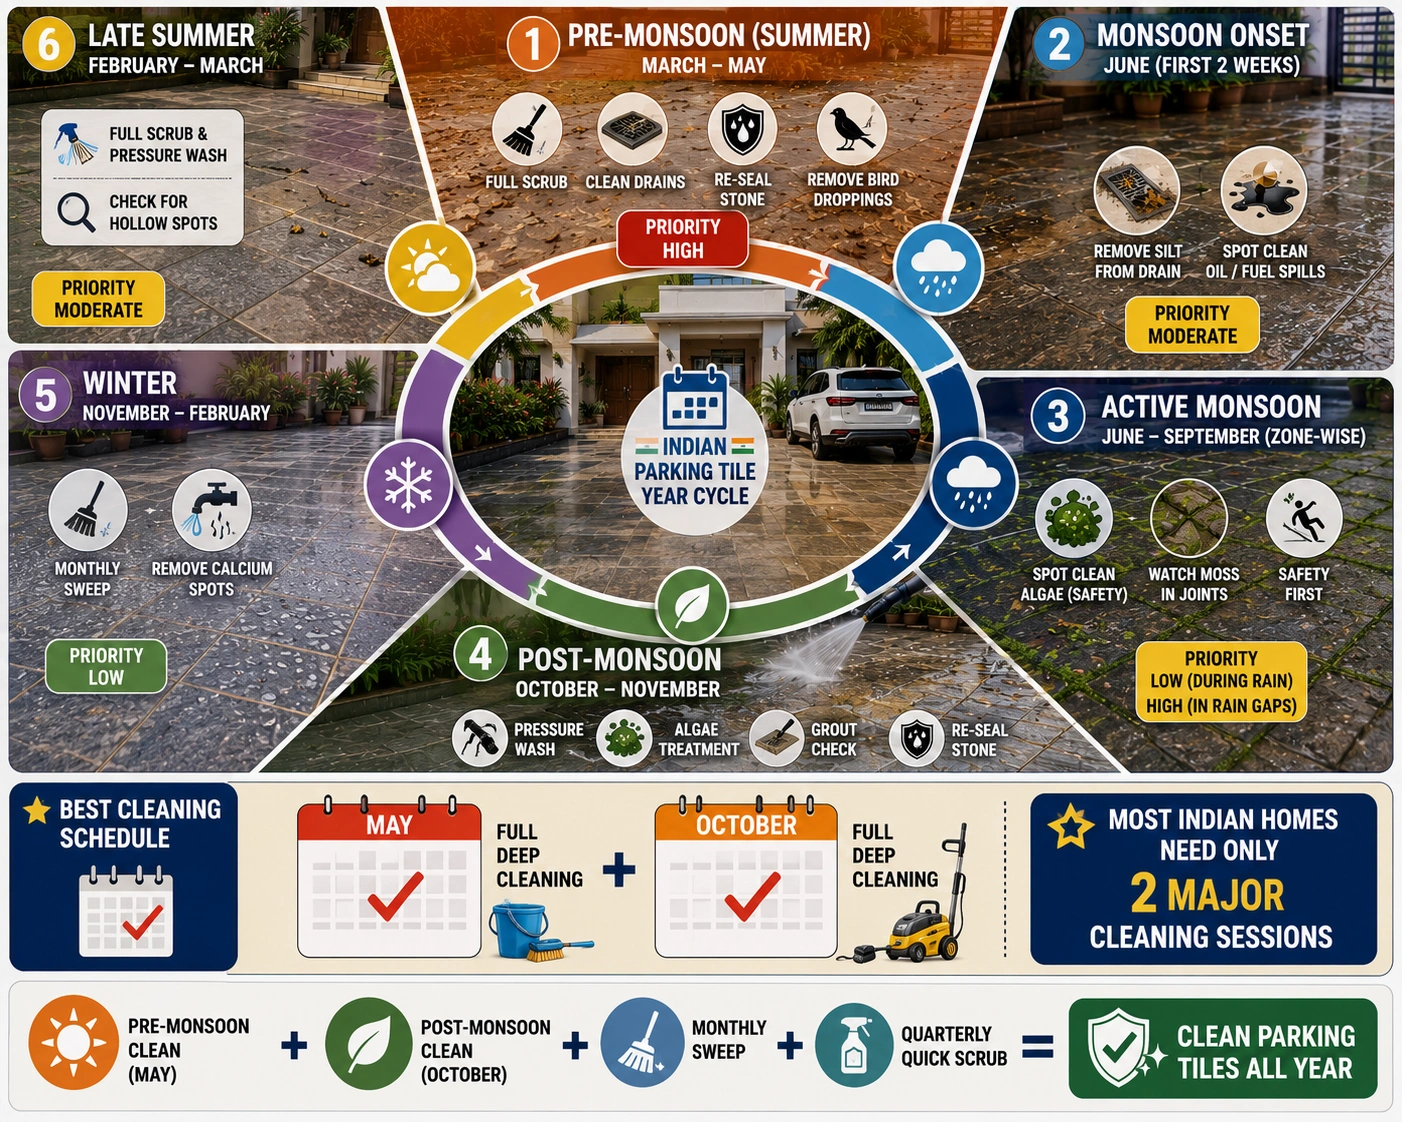
Indian climate creates four distinct maintenance windows for parking tiles. Each season leaves a different deposit and creates a different maintenance need. Working with the seasons rather than cleaning at random intervals is the most time-efficient approach.
| Season | Months (Approximate) | What Accumulates | Cleaning Priority | Key Task |
|---|---|---|---|---|
| Pre-monsoon (summer) | March to May | Fine dust, pollen, bird droppings, dried leaf debris, pre-monsoon dust crust | High | Full scrub before first rains; clear drain channels; re-seal Kota stone if needed |
| Monsoon onset | June (first 2 weeks) | Silted first-rain deposit (dusty soil mixed with water) | Moderate | Clear silt from drain entries; do not deep-clean during active heavy rain; spot-treat oil and fuel spills immediately |
| Active monsoon | June to September (zone-wise) | Algae build-up, moss in joints, accumulated silt in texture valleys | Low (during rain); High (in rain gaps) | Spot-clean algae if safety risk; wait for a rain break for full algae treatment; watch grout joints for moss establishment |
| Post-monsoon | October to November | Dried algae crust, silted grout joints, dried biofilm | Very high | Full algae treatment, moss removal, pressure wash, grout check, re-seal if using Kota stone |
| Winter | November to February | Morning dew deposit, bird droppings, and calcium spots from the water tank | Low | Monthly sweep; treat calcium deposits from water line drips; apply stain protector to grout if available |
| Late summer pre-season | February to March | Accumulated winter grime, pre-summer dust | Moderate | Full scrub and pressure wash before heat season; check for tile hollow spots after winter thermal cycling |
Pro Tip: The most time-efficient cleaning schedule for most Indian homes is two full sessions per year: one in late May before the monsoon arrives, and one in October after the monsoon ends. These two sessions address the heaviest accumulation periods. Monthly sweeping and quarterly quick scrubs fill in between.
Common Cleaning Mistakes That Damage Parking Tiles

Using acid on natural stone surfaces. This is the most damaging and irreversible cleaning mistake. Kota stone, sandstone, marble, and any limestone-based natural stone are chemically incompatible with acids. White vinegar, lemon juice, hydrochloric acid, and most descaling products contain acids that permanently etch these surfaces in minutes. The damage looks like dull, rough patches and cannot be fixed without professional stone regrinding.
Using diesel or petrol to remove tyre marks. This practice leaves a hydrocarbon film across the tile surface that attracts dust faster, reduces grip when wet, and creates a fire risk. It is common advice passed between contractors and households in India, but it has no practical benefit over proper degreaser use. The tile ends up looking cleaner briefly, but becomes more problematic within weeks.
Bleaching without diluting. Undiluted bleach on vitrified tiles strips cement grout of its colour over multiple applications and can cause slight discolouration on coloured GVT series. Always dilute to 1:10 for algae treatment on vitrified tiles and 1:20 for natural stone. Never use undiluted bleach on grout.
Not rinsing completely after acid or chemical cleaning. Residual acid or alkaline cleaner left on tile or grout continues reacting with the surface after cleaning is done. Acid residue on vitrified tiles does not cause visible damage but weakens grout over repeated applications. Always rinse with large volumes of fresh water after any chemical cleaning.
Scrubbing with metal tools or abrasive pads. Metal scrapers, steel wool, and scouring pads leave permanent scratches on vitrified tile glaze. The scratches are often not visible when the tile is dry, but show clearly when wet or under raking light. Once scratched, vitrified tile glaze cannot be repaired. Use only nylon brushes and plastic scrapers.
Cleaning during active heavy rain. Applying bleach or a degreaser during rain immediately dilutes the product before it can act. More importantly, rain on freshly applied bleach creates runoff that harms plants and contaminates drainage water. Always treat parking tiles during dry periods or during a rain break.
Skipping post-monsoon cleaning until next summer. Dried algae crust and silted grout joints left through the winter become harder to remove by summer. Algae residue in joints holds moisture through winter and supports moss establishment by the following monsoon. The post-monsoon October or November cleaning session prevents a compounding maintenance debt.
Cleaning Parking Tiles Correctly the First Time
Most parking tile cleaning problems in India come from one of two causes: using the wrong product for the stain type, or leaving the right product on too long without rinsing. The chemistry of each stain type requires a matched treatment. Oil needs an alkaline degreaser. Rubber marks need solvent. Algae needs oxidising agent. Calcium needs acid. Crossing these treatments causes damage that the stain itself would never have caused.
The good news is that well-specified parking tiles, including GHR vitrified, Full Body vitrified, and sealed natural stone, respond reliably to the methods in this guide. A driveway that is cleaned twice a year on the schedule above, with spot treatment of oil spills within the first hour, will look as close to installation condition as any outdoor surface can in Indian conditions.
If you are still choosing parking tiles for a new project, TilesFinders lists GVT, Full Body, and natural stone parking tiles across verified Indian dealers with finish, thickness, and R-value specifications. Choosing the right tile finish from the start reduces the cleaning effort at every stage and makes post-monsoon maintenance a one-hour job instead of a weekend project.
Along with finish selection, tile thickness influences long-term durability under vehicle loads. This Parking Tile Thickness Guide explains how to match tile thickness to cars, SUVs, and heavier vehicles.
FAQs
For fresh oil stains under 24 hours old, absorb the free oil with sand or sawdust, then apply a concentrated alkaline degreaser or a thick laundry detergent paste. Leave for 10 minutes, scrub with a stiff nylon brush, and rinse thoroughly. For stains over 24 hours old, use a commercial heavy-duty outdoor degreaser and the poultice method (degreaser mixed with chalk powder applied overnight under plastic film) for persistent marks. On vitrified tiles, this sequence removes most oil stains completely if done within the first week.
No. Using diesel or petrol to remove tyre marks is a common practice in Indian homes and construction sites, but it is counterproductive. Petroleum solvents spread a thin hydrocarbon film across the tile surface that attracts dust, reduces wet grip, and is a fire risk. The correct approach for tyre marks is acetone (nail polish remover) for light scuff marks, or a commercial rubber stain remover for heavy burns. Both are available at hardware shops and do not leave a residue.
The correct sequence is: apply diluted bleach (sodium hypochlorite at 1:10 with water) across all affected tiles, leave for 10 minutes without letting it dry, scrub firmly with a stiff nylon brush, and rinse thoroughly. For moss in grout joints, apply concentrated bleach with a toothbrush directly into the joint, leave for 20 minutes, scrub the joint directly, and pressure wash at 800 to 1,000 PSI. Two cycles of this treatment clear most post-monsoon algae from vitrified tiles completely.
Diluted bleach (1:10 dilution) does not damage vitrified tile glaze. It does affect cement grout over repeated applications by gradually stripping grout colourant in coloured grout and weakening the cement binder if left without full rinsing. To protect grout, always dilute bleach correctly, limit contact time to 10 minutes, and rinse completely with large volumes of water. Never use undiluted bleach on grout joints. Bleach at any concentration must not be used on natural stone parking tiles such as Kota stone, sandstone, or marble at standard bathroom cleaning strengths.
Yes, with correct settings. For GVT matte, GHR, Full Body, and rain-drop vitrified tiles, 1,000 to 1,500 PSI at a 25 to 40 degree angle, 20 to 30 cm from the surface, is safe and effective. For Kota stone and sandstone, reduce to 600 to 900 PSI at a greater distance to avoid loosening the stone sealer. Do not pressure wash hollow-sounding tiles or tiles with cracked grout joints. The water pressure forces into voids and accelerates debonding. Check every tile by tapping before starting the pressure wash session.
White hard water stains are calcium carbonate deposits from high-TDS municipal water. For light haze on vitrified tiles, a 1:1 white vinegar and water solution left for 5 minutes and scrubbed removes most deposits. For heavy build-up, use a commercial lime and scale remover at the label-recommended dilution for no more than 3 minutes, then rinse completely. Never use vinegar or any acid on natural stone tiles, including Kota stone. For hard water stains on natural stone, use a pH-neutral stone cleaner and a plastic scraper for the physical deposits.
The practical minimum for Indian conditions is a monthly sweep to remove loose grit and debris, a quarterly scrub with a neutral pH cleaner, and two full deep-cleaning sessions per year. The two full sessions should be timed as one in late May before monsoon onset (to clear winter accumulation and prepare the surface) and one in October after monsoon ends (to remove algae, silt, and moss before winter). In coastal or heavy monsoon cities, an additional mid-monsoon spot treatment for algae may be needed if the driveway develops a slip risk between the main sessions.